


2
www.midlandradio.com
Thank you
Congratulations on your purchase of the Midland
HH54 Portable Emergency Weather Alert Radio. All hazards
means the radio is the fastest, most reliable means of
receiving information on life threatening weather such as
tornadoes, hurricanes, floods, ice storms as well as civil
emergencies such as Amber alerts, hazardous explosions,
fires and chemical spills. This information is broadcast by the
National Weather Service 24 hours a day, 7 days a week so
you can stay informed no matter what time of day it is. In
addition to all hazards, the HH54 also has S.A.M.E technology
(Specific Area Message Encoding). This gives you the option of
screening out unwanted broadcasts and receiving alerts only
targeted for the geographical area you live in. Midland is proud
to say the HH54 is Public Alert Certified- meaning it has
been tested and approved to meet the Consumer Electronics
Association standards of reliability and quality as a product
carrying public safety warnings. Midland has become synony
-
mous in the weather industry for safety and reliability. We are
the leading manufacturer of weather alert radios. The HH54
is no exception. It is a quality piece of electronic equipment
skillfully constructed with the finest components. This radio is
designed for reliable and trouble free performance for years
to come. You can rely on your Midland weather radio during
severe weather.
Please Note: We encourage you to read this owner’s ma-
nual before operating the radio. This manual is a valuable
part of your new Midland HH54 Portable Emergency
Weather Alert Radio. After the radio is programmed and
operating properly, store the manual in a safe place for
future reference.
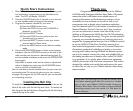
Quick Start Instructions
1. Place 3 AA alkaline batteries or the optional battery pack
into the battery compartment on the backside of the
radio. The LCD will display 12:00 AM.
2. Press the ON/OFF button for 3 seconds to turn the unit
on into standby mode and program the settings.
3. Program the weather channel for your area:
(a) Press the MENU button once.
(b) Press the DOWN arrow until CHANNEL is
displayed on the LCD.
(c) Press the SELECT button.
(d) Press the DOWN arrow until you hear the
broadcast of your station.
(e) Press the SELECT button to save your station
and exit back to Menu mode.
(f) Press the MENU button to exit back to standby
mode.
4. Press the WX/SNOOZE button to listen to the weather
broadcast. Use the UP/DOWN arrows on the side of the
radio to adjust the volume to a desired listening level. To
exit the weather broadcast mode press the WX/SNOOZE
button again.
Note: When in weather mode and the volume is adjusted and
volume is displayed you must press the WX/SNOOZE button
twice to exit back to standby mode.
You are now able to receive weather alerts for your area and
surrounding areas. To narrow the alerts to just your county,
see page 4 to program the S.A.M.E code for your county and/
or surrounding counties.
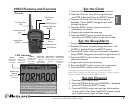
Installing the Belt Clip
To install the belt clip, slide the clip down into the slot on the
back of the radio until the belt clip latch clicks. To remove the
belt clip, press the lock tab down, then gently pull the belt clip up
toward the top of the radio.