


7
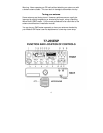
FRONT PANEL CONTROLS
1. ROTARY CHANNEL SELECTOR: This easy to operate control allows
changing of weather or CB channel, either up or down. This control will
not operate when the channel “LOCK” function has been activated.
2. MICROPHONE CONNECTOR: Plug in the supplied microphone to this
connector. The collar ring has a screw on locking ring. Push the ring onto
the units collar and screw on until it is tight.
3. ON/OFF VOLUME: In the off position your transceiver’s power is off. Turn
this control clockwise to switch on the unit and adjust the volume.
4. SQUELCH CONTROL: Adjust this control until background noise just
disappears. If the control is adjusted too far clockwise it may cause
muting of weaker signals.
5. RF GAIN CONTROL: This control adjusts the receiver sensitivity. Adjust
the control for best reception of distant or local stations. Begin with
control fully clockwise. To reduce reception of unwanted distant stations,
turn control counter-clockwise until only desired stations are heard.
6. MIC GAIN CONTROL: Rotating this control fully clockwise will result in
the greatest microphone output. /rotating the control counter-clockwise
reduces the microphone output, improving the sound in high noise
environments. This control can also be used to control optional power
microphone output.
7. CHANNEL DISPLAY: LCD (liquid crystal display) read-out of selected CB
or weather channel.
8,11,13. M1, M2, M3 INDICATOR: These LCD boxes are illuminated when a
memory button has been used to select the CB channel.
9. TX INDICATOR: LCD indicator for showing the unit is transmitting.
10. SCAN INDICATOR: This indicates channel scanning is operating.
12. WX INDICATOR: When this indicator is illuminated it indicates your unit
is in the weather receive mode. Weather channels are displayed.
14. S/RF DISPLAY: LCD read-out of received signal strength and relative
transmitter power output.