


6
Looking at or near the Sun will cause irreversable damage to your eye. Do not point this telescope at or near the
Sun. Do not look through the telescope as it is moving.
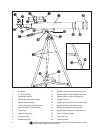
To move the telescope on the mount, unlock the altitude locking control handle (7, Fig. 1) by turning the handle
counterclockwise one complete turn. Hold the handle while moving the telescope in altitude and/or azimuth. When
finished, lock the altitude control handle by tightening the handle, turning clockwise. Tip: By keeping the altitude
locking handle slightly tight, the telescope can still be moved in altitude without running the risk of having the
telescope “flip” in the up or down movement.
VIEWFINDER FOCUSING AND ALIGNMENT
The 5 x 24mm viewfinder (2, Fig. 1) is a low-power, wide-field sighting device that, once aligned, will allow you
to point the telescope with greater precision. Take note that when you look through the viewfinder, you will see a
crosshair with images that will be upside-down; this is normal.
To work properly, the viewfinder must first be aligned to the telescope’s main optical tube. To align the viewfinder,
follow these steps:
1. Remove the lens cap (21, Fig. 1) of the optical tube assembly. Place the H 25mm eyepiece in the diagonal
mirror and point the optical tube assembly (5, Fig. 1) at some well-defined, distant land object (e.g. the top of a
distant telephone pole). Note: Images are either backwards or upside-down, depending on the rotation angle of
the diagonal mirror; this is normal. It is recommended that you choose an object that is as distant as possible, so
that the viewfinder alignment will be accurate enough to point the telescope at individual planets and stars during
astronomical observations.
2. Look through the viewfinder (2, Fig. 1) and tighten or loosen, as appropriate, the viewfinder bracket’s three
collimation screws (4, Fig. 1), until the crosshairs of the viewfinder are precisely centered on the same object
already centered in the telescope’s H 25mm eyepiece. When finished, tighten the viewfinder’s three collimation
screws to a firm feel so that it remains in alignment.
3. Objects located in the 5 x 24mm viewfinder will now be centered in the telescope eyepiece.
USING THE TELESCOPE
With the telescope assembled, you are ready to begin observations.
1. First, pick out an easy-to-find object. Observing land objects during the daytime is a good way to become
accustomed to the operation of the telescope. At night, try observing the Moon at first (if it is visible) or a bright
star.
2. To center an object in the main telescope, first use the aligned viewfinder to find the object you wish to observe.
If necessary, slightly loosen the altitude locking control handle (7, Fig. 1), to re-position the telescope so that the
desired object can be centered in the viewfinder. When the object is centered in the viewfinder, it should then,
also, be somewhere in the main telescope’s field of view. Next, using the 25mm eyepiece, center the object in
the main telescope’s field of view, and sharply focus the image by turning the focus knob (22, Fig. 1).
The wide-field H 25mm eyepiece included as standard equipment is the best eyepiece to use for the initial finding
and centering of an object. The low-power H 25mm eyepiece presents a bright, wide field of view, ideal for
terrestrial and general astronomical observing of star fields, clusters of stars, nebulae, and galaxies. For lunar
and planetary viewing, switch to a higher power eyepiece such as the H 12.5mm – if you have good viewing
conditions. If the image starts to become fuzzy as magnification is increased, back down to a lower power; The
atmosphere is not steady enough to support higher powers. Note: Changing eyepieces changes power.
3. If you are observing an astronomical object (the Moon, a planet, star, etc.) you will notice that the object will
begin to move slowly through the telescopic field of view. This movement is caused by the rotation of the Earth
and makes an object appear to be moving in the telescope’s field of view. To keep astronomical objects centered
in the field, simply move the telescope up or down, or side-to-side (vertical and/or horizontal), using the altitude
control handle (7, Fig. 1) as appropriate. At higher powers, astronomical objects will seem to move through the
field more rapidly.
4. Avoid touching the eyepiece while observing through the telescope. Vibrations resulting from such contact will
cause the image to move. Avoid observing sites where vibrations may introduce image movement. Viewing
from the upper floors of a building may also introduce image movement.
5. Allow a few minutes for your eyes to become “dark adapted” prior to attempting any serious observations. Use
a red-filtered flashlight (you can make your own by taping red cellophane over a flashlight lens) to protect your
night vision when reading star maps, or inspecting components of the telescope.