


5
Looking at or near the Sun will cause irreversable damage to your eye. Do not point this telescope at or near the
Sun. Do not look through the telescope as it is moving.
INTRODUCTION
Before you begin your visual journey, we urge you to take a few minutes to completely read this manual so that
you can get the best use of the equipment. This manual details the setup, operation, specifications, and optional
accessories of the Meade 50AZ-P Altazimuth Refracting Telescope. The Meade 50AZ-P is designed for both
astronomical and terrestrial observing. Whether you are observing objects a few meters away or light years distant,
the Meade 50AZ-P’s precision optics and sturdy mount are the tools with which you can learn basic telescope skills
that can lead to a lifetime of enjoyment and discovery.
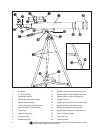
STANDARD EQUIPMENT (Refer to Fig. 1)
• Complete optical tube assembly with 50mm-diameter, 625mm focal length, coated objective lens;
dew shield; 5 x 24 viewfinder with bracket; rack-and-pinion focuser.
• Altazimuth mount with pre-attached continuously-adjustable steel tripod and leg braces.
• Altitude locking control handle.
• Accessories:
Wide-field H 25mm (25X), H 12.5mm (50X) eyepieces (.965” O.D. “Outside Diameter”)
3x Barlow lens
Diagonal mirror (.965”)
Viewfinder
Accessory tray
Autostar Suite astronomy software CD-Rom (separate instructions supplied with the software
package)
UNPACKING AND ASSEMBLY
Note that although the telescope is unassembled, all of the more difficult or complicated sections of the instrument
are already factory pre-assembled; first time assembly of the telescope should not require more than about 15
minutes. To set up the telescope, follow this procedure:
1. Remove and identify the telescope’s components, using the listing on page 3.
2. Spread the three tripod legs (8, Fig. 1) evenly apart and insert the accessory tray (10, Fig. 1) in the hole at the
center of the leg brace supports (9, Fig. 1).
3. Snugly thread-in the altitude locking control handle (7, Fig. 1) into the altazimuth mount (11, Fig. 1) at the optical-
tube-to-mount attachment point (12, Fig. 1). Thread-in the optical-tube-to-mount attaching knob (13, Fig. 1) until
snug, and then tighten the optical-tube-to-mount lock knob (14, Fig. 1).
4. Attach the viewfinder (2, Fig. 1) and viewfinder bracket (3, Fig. 1) by unthreading the two viewfinder bracket
attaching nuts (6, Fig. 1) that are located on the tube near the focuser and placing the viewfinder bracket (with
the eyepiece-end of the viewfinder facing the focuser of the telescope) over the two protruding threaded studs.
Then replace the two viewfinder bracket attaching nuts to secure the bracket to the optical tube.
5. Insert the diagonal mirror (15, Fig. 1) into the eyepiece holder (17, Fig. 1) and the wide-field H 25mm eyepiece
(1, Fig. 1) into the diagonal mirror. Secure each in place with a moderate tightening of the respective
thumbscrews.
6. Extend the sliding leg extension (19, Fig. 1) portion of the adjustable height tripod to the desired length on all
three legs by rotating the sliding leg extension collar (18, Fig. 1) counterclockwise to release the inner sliding leg.
When you achieve the desired height, lock the tripod leg by rotating the sliding leg extension collar clockwise
until it is snug. Do not over-tighten the locking collars as they can become damaged.
ALTAZIMUTH MOUNT MOVEMENTS AND LOCK
The telescope can tilt just over 90° in altitude (the up-and-down movement) and rotate 360° in azimuth (the side-to-
side movement), hence the term “Altazimuth” in this telescope’s mount. The Altazimuth mount can be locked only in
altitude, the azimuth movement is always free.