


QUICK-START GUIDE
Quick Start Guide 3
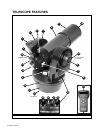
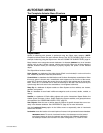
B
A
A
A
5
6
A
B
C
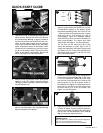
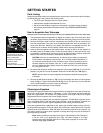
1
2
3
3. Flip the Power Switch (A) on the computer control
panel to the ON position. The copyright message
lights on Autostar’s LCD display.
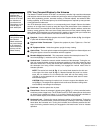
1. Take the ETX from its packaging and place it on a
sturdy surface. Remove the cover from the bat-
tery compartment (
20, Fig. 1, page 4) located on
top of the drive base and carefully lift the 9v con-
nector and the battery holder from the compart-
ment. Insert six AA-size batteries into the battery
holder, oriented as shown on the battery holder.
Connect the 9v connector plug (A) to the connec-
tor (B) on the battery holder. Return the battery
holder to the battery compartment. Replace the
cover. See page 10 for more information.
2. Make sure that the computer control panel power
switch is in the OFF position. Remove Autostar
(
18, Fig. 1) from the packing materials and plug it
into the HBX port (A).
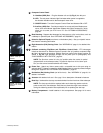
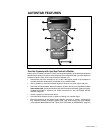
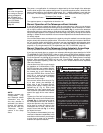
4. Press the Speed/? key (C) to accept the Sun
warning. Keep pressing the ENTER key (A) until
"Country/State" appears on the display. (Ignore
the prompts requesting "Date" and "Time" for now
– these functions will be explained later). Use the
Scroll keys (D) to cycle through the lists of
Country/States, Cities, and Telescope Models.
Press ENTER (A) when the correct information for
each prompt displays. The display then reads
"Setup: Align." See page 11 for more information.
You can now use the Arrow keys (B) to slew
(move) the telescope up, down, right, or left. To
change the telescope’s slew speed, briefly press
the Speed/? key (C). Each press decreases the
slew speed down one level, and then will cycle
back to the fastest speed.
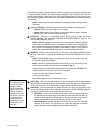
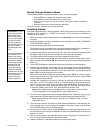
5.
Tighten (to a "firm feel" only, do not overtighten) the
vertical and horizontal locks (6, 9, Fig. 1).
See page
5 for more information. Remove the dust cover
from the end of the telescope tube. Place the MA
25mm eyepiece (A) into the eyepiece holder on
the telescope and tighten the attachment thumb-
screw (B) to a "firm feel" only. Make sure that the
flip-mirror control (C) is in the “up” position. See
page 6, for more information.
6. Sight along the side of the telescope’s main tube
to locate an object. Practice using the Autostar’s
Arrow keys to center an object in the telescope’s
field of view. Use the telescope’s focus knob (
8,
Fig. 1) to bring the object into focus.
Slew Speed:
Slow
.
.
.
Medium
.
.
.
Fast
4
A
C
D
B
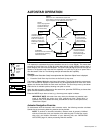
If you wish to observe using Autostar’s
databases, go to
:
Page 14 to learn how to perform an Easy Two-Star Alignment;
Page 15 for some practice observing exercises;
Page 16 to
learn about Autostar’s menus and databases.