


Appendix C: PRECISE POLAR ALIGNMENT; SETTING CIRCLES
If desired, you may obtain more precise polar alignment by first accomplishing basic polar alignment as
detailed in
POLAR ALIGNMENT PROCEDURE, page 16, then returning to this procedure:
Note: This procedure moves the telescope physically to line up precisely with the celestial pole.
Do not use the Electronic Controller Arrow keys to move the telescope electronically or polar
alignment will be lost.
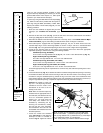
1. Orient the entire telescope, including tripod or tripod legs, so that the polar axis is pointing toward Polaris
(Fig. 14).
2. While observing through the SP 26mm eyepiece of the telescope, adjust the length of the adjustable
tripod leg until Polaris is visible in the eyepiece. Use a combination of (a) lifting and turning the entire
telescope (or nudging the position of one of the fixed tripod legs) and (b) adjusting the length of the
adjustable tripod leg to place Polaris in the center of the telescope's field.
3. Repeat step 2 of this procedure in about 15 minutes to see how much drift has taken place and to make
the alignment more precise.
Although the above procedure is somewhat tedious (since the field of view of the telescope with the SP
26mm eyepiece is only about 1°), it is a worthwhile effort if precise polar alignment is desired (e.g., if
photography of the Moon or a planet is to be performed). With Polaris placed in the center of the telescope’s
eyepiece, the telescope is now polar aligned within about one or two degrees, a level of alignment precision
more than sufficient for almost any observing application.
To provide the most stable platform from which to polar align the ETX models, it is recommended to
purchase the #883 Deluxe Field Tripod. The tripod head tilts easily to the local latitude angle for quick polar
alignment, and it locks in a 90° position to facilitate Alt/Az viewing (see OPTIONAL ACCESSORIES, page 20).
Setting Circles
The ETX models are equipped with R.A. and Dec. setting circles (13 and 16, Fig. 1) to aid in locating faint
celestial objects when the telescope has been polar aligned. Setting circles emulate the celestial
coordinates found on star charts or in sky catalogs. Any charted object is easily located by coordinates in
R.A. (in hours, minutes, and seconds, from 0h 0m 0s to 23h 59m 59s) and Dec. (in degrees from 0° to ±90°).
With an ETX model polar aligned, use the Electronic Controller Arrow keys (1, Fig. 3) to move the telescope
in R.A. (left and right keys) and Dec. (up and down keys).
Note: The Dec. setting circle is located on the left arm of the telescope fork mount. The right
arm of the mount contains a graduated circle (mounted behind the knurled knob of the vertical
lock), without Dec. numbers.
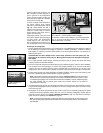
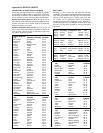
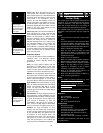
• Declination Setting Circle: The Dec. setting circle (Fig. 31) has been factory set to read the correct
Declination of celestial objects.
Because the smooth knob on this fork mount arm need never be loosened, the Dec. setting circle should
always remain calibrated. If for some reason this knob becomes loose and the Dec. setting circle must
be recalibrated, level the optical tube (5, Fig. 1) so that it is parallel to the drive base. Loosen the smooth
knob covering the Dec. setting circle until the setting circle moves freely. Reposition the setting circle so
that the 0 setting aligns with the Dec. pointer (5, Fig. 16). Retighten the Dec. knob.
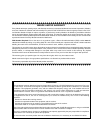
• Right Ascension Setting Circle: Since celestial objects move in R.A., the R.A. setting circle (Fig. 32)
must be reset as each object is located during an observing session. The R.A. pointer is located on the
drive base 90° counterclockwise from the telescope’s Computer Control panel (10, Fig. 1) immediately
under the R.A. circle.
To use the setting circles to find astronomical objects, the ETX must first be polar aligned. It is advisable
that the motor drive be turned on (see APPENDIX A, page 26) and that a low-power eyepiece (e.g., the SP
26mm eyepiece) be employed. Then use the following procedure:
1. Identify the celestial coordinates (R.A. and Dec.) of a bright, easy-to-find object, such as a bright star.
(Avoid using Polaris or any object near Polaris.) Coordinates of bright stars are listed in the STAR
LOCATOR,
page 27, astronomy magazines, text books, or star charts. Center this object in the telescope’s
field of view.
2. Manually turn the R.A. circle (13, Fig. 1) to read the R.A. of the object at the R.A. pointer (7, Fig. 16).
3. The R.A. circle is now calibrated to read the correct R.A. of any object at which the telescope is pointed.
The Dec. circle is already calibrated through polar alignment.
4. To find another object, again identify the R.A. and Dec. coordinates. Then, without touching the setting
circles, move the telescope (manually, by unlocking the vertical and horizontal locks, or by slewing the
telescope using the Electronic Controller Arrow keys) so that the R.A. and Dec. pointers read the
coordinates of the second object.
5. If the above procedure has been followed carefully, the second object will now be in the telescope’s field
of view.
Note: Since the second object (i.e., the object to be located) is in constant motion, once the
R.A. circle is calibrated (step 2, above) the telescope should be moved rapidly to read the
coordinates of the second object. Otherwise the second object will no longer be in the position
indicated by the R.A. circle.
Using setting circles requires a developed technique. When using the circles for the first time, try hopping
from one bright star (the calibration star) to another bright star of known coordinates. Practice moving the
telescope from one easy-to-find object to another. In this way the precision required for accurate object
location becomes familiar.
141312
1112 10
Fig. 31: Section of
Declination setting circle.
0
10
20
30
40
40
30
20
10
Important Note:
For almost all
astronomical
observing
requirements,
approximate settings
of the telescope’s
latitude and polar axis
are acceptable. Do
not allow undue
attention to precise
polar alignment of the
telescope to interfere
with your enjoyment
of the instrument.
Note: The R.A. circle
has two rows of
numbers from 0 to 23,
corresponding to the
hours of a 24-hour
clock. The upper row
of numbers is used by
observers in the
Earth’s Northern
Hemisphere, the
lower row by
observers in the
Earth’s Southern
Hemisphere.
- 28 -
Fig. 32: Section of Right
Ascension setting circle.