


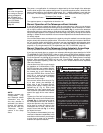
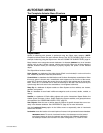

Moving Through Autostar’s Menus
The Autostar database is organized in levels for quick and easy navigation.
• Press ENTER to go deeper into Autostar's menu levels.
• Press MODE to move back toward the top menu level.
• Press the Scroll keys to move up and down through the options available for
each level.
• Press the Arrow keys to enter characters and digits.
The Arrow keys are also used to move the telescope.
Initializing Autostar
This section describes how to initialize Autostar. Perform this procedure the first time you use
Autostar or after performing a RESET. An example of this procedure is presented in
"APPENDIX E," page 36.
1. Make sure that the vertical and horizontal locks (
6 and 9, Fig. 1) are secured as described
on page 5.
2. Verify that Autostar is properly connected to your telescope. See “HOW
TO ASSEMBLE
YOUR TELESCOPE,”
page 10.
3. Flip the telescope power switch to the ON position.
The Autostar screen is activated and a copyright message displays briefly, followed by a
short beep. Then Autostar takes a few moments to start up the system.
4. A message displays that warns not to look at the Sun. At the end of this message, press
the Speed/? key to signify that the message has been read and understood.
5. The Getting Started menu displays a scrolling message with two choices:
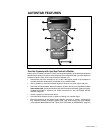
a. Hold down the Speed/? key (
8, Fig. 3) for information on Autostar functions and controls.
When finished, press MODE (
3, Fig. 3) to exit Help and to return to the Getting Started pro-
cedure, or,
b. Press ENTER (
2, Fig. 3) to bypass the Help tutorial and continue with initialization.
6. Autostar then requests the current date. Use the Up and Down Arrow keys (
5, Fig. 3) to
enter the digits for the date. Use the Right Arrow key (
5, Fig. 3) to move from one number
to the next in the day display, and also to move to the month. Then, use the Scroll keys (
6
and 7, Fig. 3
) to cycle through the list of months.
When the
current month is displayed, use the Right Arrow (5, Fig. 3) to move to the year.
Use the Up and Down Arrow keys to enter all four digits of the current year. Press ENTER
when the date has been entered.
7. Autostar then requests the current time. Use the Up and Down Arrow keys to enter the
time. (Use a "0" for the first digit if less than 10.
) Use the Right (or Left) Arrow key to move
from one number to the next. Press one of the Arrow keys (
5, Fig. 3) to scroll to "AM" or
"PM." If you select the "blank" choice that follows "AM" and "PM," the clock displays time
in a 24-hour (military time) format. Then, press ENTER to start the clock.
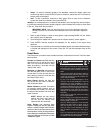
NOTE: When multiple choices are available within a menu option, the current option
is usually displayed first and highlighted by a right pointing Arrow (>).
8. The next screen requests the status of Daylight Savings Time. Pressing a Scroll key tog-
gles between the YES/NO settings. Select the desired setting by pressing ENTER.
NOTE: Daylight Savings Time may be referred to by a different name in various
areas of the world.
9. The next screen asks for the Country or State (listed alphabetically) of the observing site.
Use the Scroll keys to cycle through the database of countries, states, and provinces.
Press ENTER when the correct location displays.
10. The next screen asks for the city (listed alphabetically) closest to the observing site. Use
the Scroll keys to cycle through the database of cities. Press ENTER when the correct city
appears on screen.
11. The next screen asks for the telescope model. Use the Scroll keys to locate ETX-60 or
ETX-70. Press ENTER to select the appropriate model.
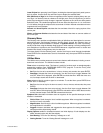
12. System initialization is complete and the screen reads "Setup: Align".
Initialization is a pro-
cedure that ensures
that Autostar oper-
ates correctly. When
you first use Autostar,
it doesn't yet know
where the observa-
tion location site is or
the time or date of
the observation ses-
sion.
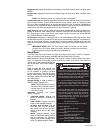
During the procedure,
you will enter infor-
mation, such as the
current time and date,
observation location,
and telescope model.
Autostar uses this
information to pre-
cisely calculate the
location of celestial
objects (such as stars
and planets) and how
to move your tele-
scope correctly for
various operations.
12 Getting Started