


- 7 -
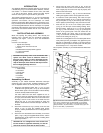
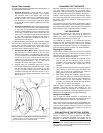
Fig. 8. (Note that the secondary mirror is misaligned.)
Secondary Mirror Adjustments
If the secondary mirror (1, Fig. 8) is centered in the drawtube
(2, Fig. 8) but the primary mirror is only partially visible in the
reflection (3, Fig. 8) the 3 hex screws located on the secondary
mirror assembly (2, Fig. 5) must be unthreaded slightly to refine
the tilt-angle of the secondary mirror until the entire primary
mirror can be seen centered within the secondary mirror
reflection. When the secondary mirror is correctly aligned, it will
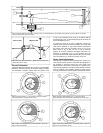
look like Fig. 9. (Note that the primary mirror is misaligned.)
Primary Mirror Adjustments
If the secondary mirror and the reflection of the primary mirror
(1, Fig. 9) appear centered within the drawtube (2, Fig. 9) but
the reflection of your eye (3, Fig. 9) appears off-center, you will
need to adjust one or more of the three primary mirror hex
screws of the primary mirror cell. These primary hex screws are
located behind the primary mirror, at the lower end of the main
tube. Adjust the primary mirror alignment by slightly turning one
hex screw at a time, looking through the focuser after each
adjustment to determine if the mirror is moving in the correct
direction.
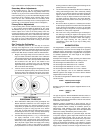
Star Testing the Collimation
With the collimation performed, the next step is to test the
accuracy of the alignment on a star. Use the 25mm eyepiece
and point the telescope at a moderately bright (second or third
magnitude) star, then center the star image in the telescope’s
field-of-view. With the star centered, follow the method below:
1. Bring the star image slowly out of focus until one or more
rings are visible around the central disc. If the collimation
was performed correctly, the central star disk and rings will
be concentric circles, with a dark spot dead center within
the out-of-focus star disk (this is the shadow of the
secondary mirror), as shown in Fig. 10A. (An improperly
aligned telescope will reveal elongated circles, Fig. 10B,
with an off-center dark shadow.)
2. If the out-of-focus star disk appears elongated (Fig. 10B),
you will need to adjust the primary mirror tilt hex screws of
the primary mirror cell. Adjust the hex screw on the mirror
cell until the circles are concentric on either side of focus.
TIPS ON USING A
DOBSONIAN TELESCOPE
1. Never lubricate the Teflon pads on the ground plate. The
Meade Starfinder Dobsonian has been designed with
some inherent friction. You want the telescope to move
easily when you position it, but you also want it to stay in
the position you place it. Using any kind of oil, silicone
spray, wax, or grease will ruin the performance by causing
the telescope to move too easily. Just keep these bearing
surfaces clean; that’s all the maintenance required.
2. The altitude bearing surfaces (11, Fig 1) of the telescope
are lightly lubricated at the factory for optimum
performance. Over a period of time, these surfaces may
become dry or dirty. Simply clean off the bearing surfaces
with a dry cloth or paper towel and reapply a thin coating
of silicone grease or spray to the surfaces to maintain
peak performance. Do not use solvents or alcohol-based
cleaning solutions as this may damage the bearings or the
painted surfaces of the telescope.
3. You will notice that your telescope will move in altitude by
raising and lowering the tube, and in azimuth by rotating
the base. As you observe objects in the night sky they will
appear to drift out of the field of view due to the Earth’s
rotation. To keep an object centered in the field of view,
just lightly nudge the telescope in the proper direction.
This may take a little practice at first, but you’ll soon get
the hang of it.
4. Be sure the Mount is placed on a relatively level surface
to allow proper operation. Each of the three feet should be
in firm contact and not wobble. If you are in an area with
particularly rough or soft ground, it may be helpful to place
the Mount on a thick piece of plywood.
5. Part of the fun of using a Dobsonian type of telescope is
the challenge of hunting for objects in the night sky. Invest
is some simple star charts and books that tell you how to
locate objects using a technique called “star hopping.”
Once you begin learning the star patterns and
constellations, you’re well on you way to finding many
amazing sights.
MAGNIFICATION
The magnification, or power, at which a telescope is operating
is determined by two factors: the focal length of the eyepiece
employed and the focal length of the telescope. The Meade
Starfinder Dobsonian telescope is supplied with one eyepiece
as standard equipment. The focal length of the eyepiece,
25mm, is printed on its side.
Telescope focal length is, roughly speaking, the distance that
light travels inside the telescope before reaching a focus.
The focal length of the Dobsonian 6" f/8 = 1220mm.
The focal length of the Dobsonian 8" f/6 = 1220mm.
The focal length of the Dobsonian 10" f/4.5 = 1140mm
The focal length of the Dobsonian 12.5" f/4.8= 1525mm
On a given telescope, such as the Starfinder Dobsonian,
different eyepiece focal lengths are used to achieve different
magnifications, from low to high.
To calculate the magnification obtained with a given eyepiece,
use this formula:
Power = Telescope Focal Length
___________________
Eyepiece Focal Length
Example: Using the 25mm eyepiece supplied with the 8" f/6,
the power is:
Power = 1220mm
________ = 49x
25mm
The type of eyepiece, whether Modified Achromatic, Plössl, or
Super Plössl, has no effect on magnification, but does have a
bearing on such optical characteristics as field of view, flatness
of field, and color correction.
Maximum practical magnification is about 50X per inch of
aperture. Generally, however, lower powers will produce higher
image resolution. When unsteady air conditions prevail (as
witnessed by rapid “twinkling” of the stars), extremely high
powers result in “empty” magnification, where the object detail
observed is actually diminished by the excessive power.
When beginning observations on a particular object, start with
a low power eyepiece; get the object well-centered in the field
of view and sharply focused. Then try the next step up in
magnification. If the image starts to become fuzzy as you work
up into higher magnifications, then back down to a lower
power: the atmospheric steadiness is not sufficient to support
high powers at the time you are observing. Keep in mind that a
bright, clearly resolved, but smaller, image will show far more
Fig. 10A.
Fig. 10B.