


- 4 -
INTRODUCTION
The Starfinder Dobsonian telescope will open up the skies for
a breathtaking array of visual observations. Galaxies, nebulae,
star clusters — in all their variations of form, color, and extent
— as well as the Moon, planets, comets and other objects
within the solar system, may be studied in great detail.
This manual is designed for the 6", 8", 10", and 12.5" Starfinder
Dobsonian Telescopes. With the exception of a few assembly
operations and features, the four telescopes are almost
identical operationally. When differences in procedures occur,
they are clearly noted. Most standard and optional accessories
are interchangeable between the four telescopes. For optimal
enjoyment of the telescope, please take a few minutes to read
this manual and become familiar with all of the instrument’s
capabilities.
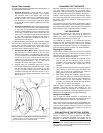
PARTS LISTING AND ASSEMBLY
When first opening the packing boxes, note carefully the
following parts included with the Starfinder Dobsonian
Telescope (use Figure 1 and 2 to aid in the identification
process):
Carton #1: The Telescope
— Optical tube assembly
— Primary mirror mounted in its cell
— Focuser
— Modified Achromat (MA) 25mm eyepiece
— 5 x 24mm viewfinder
— Hardware kit.
CAUTION: The primary mirror must be handled with
special care. Never touch its reflective surface or
place the mirror where it could be damaged. Save all
original packing materials; if it is ever necessary to
ship the telescope, these materials will help to assure
that no shipping damage will occur.
Carton #2: The Mount
— 2 Side boards
— Front board
— Ground plate
— Base plate
— 2 Handles
— Hardware kit
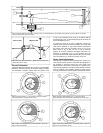
Assembling the Mount
Assembly of your Meade Starfinder Dobsonian telescope
should only take a few minutes. A phillips screwdriver, pliers,
and an adjustable wrench are the only tools you will need.
1. Attach the self-adhesive rubber feet (11, Fig. 2) to the
underside of the ground plate (10, Fig. 2), the round piece
with the Teflon pads. The feet should be mounted directly
under the already installed Teflon pads.
Two extra rubber feet have been supplied for use as
“bumpers” where the telescope tube hits the front board
(5, Fig 2.) at the travel limits. Place one in the center of the
top ledge, and one in the center on the inside near the
bottom (see Fig. 2). The exact position for these two
bumpers will be obvious with the telescope mounted on
the base.
2. Attach the front board (5, Fig. 2) loosely to the two side
boards (4, Fig. 2) using the supplied wood screws
(3,Fig.2), and the predrilled holes. Do not fully tighten the
screws yet.
3. Attach the front board/side board assembly to the base
plate (7, Fig 2) using the supplied Wood Screws, and the
predrilled holes. Snugly tighten all screws, including those
previously installed.
CAUTION: Do not overtighten the wood screws. The
screws should be tightened sufficiently so that the
head of the screw is flush with the wood surface.
4. Firmly press the screw cover caps (2, Fig. 2) into the
heads of the wood screws on the side boards. You may
have to lightly tap the screw cover caps to properly seat
them into the screw heads.
5. Install the two handles (1, Fig. 2) onto the side boards
utilizing the supplied screws. Firmly tighten the screws.
6. To install the center pivot bearing, first insert the nylon
center bearing bushing (8, Fig. 2) into the center hole of
the ground plate (10, Fig. 2) from the top side. You may
have to lightly tap the bushing to fully seat it into the hole.
7. Place the four (six on the 12.5" model) nylon washers
(9, Fig. 2) onto the nylon center bearing bushing. Then,
from the bottom, insert the 2 1/4" x 5/16" hex pivot bolt
(12, Fig. 2), with a flat washer (13, Fig. 2) up through the
center of the ground plate. This bolt should then be
inserted through the center hole of the base plate
(7,Fig. 2). Secure this assembly with the other flat washer
and the 5/16" locking nut (6, Fig. 2).
NOTE: Do not overtighten the nut or the base plate will not
easily rotate upon the ground plate. Only tighten the pivot
bolt and nut sufficiently to maintain a very light pressure
between the ground plate and base plate. The two parts
should easily turn in a “Lazy Susan” fashion.
This completes assembly of your Meade Starfinder Dobsonian
Mount.
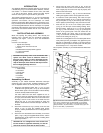
Fig. 2: Construction of the Dobsonian Mount. (1) Handle; (2) Screw
Cover Caps; (3) Wood Screws; (4) Side Boards; (5) Front Board;
(6) 5/16" Locking Nut; (7) Base Plate; (8) Center Bearing Bushing;
(9) Nylon Washer; (10) Ground Plate; (11) Rubber Foot; (12) 2 14" x
5/16" Hex Pivot Bolt; (13) Flat Wa s h e r s .
1
1
4
5
6
7
8
9
10
13
11
12
3
2
2
11