


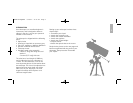

ASSEMBLE YOUR TRIPOD
The tripod is the basic support for your
telescope. Its height may be adjusted so that
you can view comfortably.
NNoottee:: NNuummbbeerr iinn bbrraacckkeettss,, ee..gg..,, ((33)),, rreeffeerr
ttoo FFiigg.. 11..
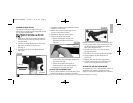
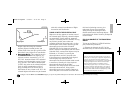
1. Make sure that as you attach the legs (1)
to the mount that the leg braces (24) are
facing inward.
2. Line up the holes at the top of one of the
legs with the holes in the mount.
See Fig. 2.
3. Thread one of the 2-inch bolts through
the holes.
Meade accessories, such as the Barlow lens.
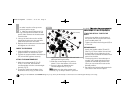
1. Line up the holes at the end of one of the
leg brace supports (8) with the holes in
one of the leg braces (9).
2. Thread one of the one-half inch bolts
through the holes.
3. Thread a hex nut over the end of the bolt.
4. Finger tighten the bolt and hex nut.
See Fig. 3.
5. Repeat with the two other leg braces.
6. Thread the accessory tray (26) over the
center mounting bolt to a firm feel.
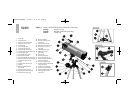
ATTACH THE RED DOT VIEWFINDER
An eyepiece (17) has a narrow field of view. A
viewfinder (22) makes it easier to locate
objects. The red dot viewfinder has a red dot
3
b. Slide the inner portion of the leg (39) in
or out to the desired length. Repeat for
the other two legs.
c. Rotate and tighten the leg lock
thumbscrew to relock the leg lock.
d. Repeat for the other two legs.
ATTACH THE ACCESSORY TRAY
The tray helps stabilize the tripod and is also
a convenient holder of eyepieces and other
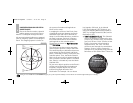
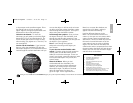
4. Thread a wingnut over the bolt and hand-
tighten to a firm feel.
5. Attach the remaining two legs to the
mount in the same manner.
6. Spread the legs out evenly apart.
7. Set the height of your tripod:
a. Rotate and loosen the leg lock
thumbscrew (38) to unlock the
leg lock.
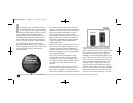
Fig. 4
Fig. 2
2” Screw
tripod
leg
mount
washer
wingnut
Fig. 3
finger tighten the
hex nut
Looking at or near the Sun will cause irreversible damage to your eye. Do not point this telescope at or near the Sun. Do not look through the telescope as it is moving.
Meade114EQASTR 3/28/07 9:33 AM Page 5