


Fig. 8B
Fig. 8C
87
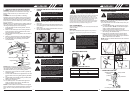
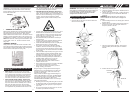
• INSTALLATION OF THE METAL BLADE
FUEL AND LUBRICATION
WARNING: Never use straight petrol in
your unit. This will cause permanent engine
damage and void the manufacturer’s warran-
ty for that product. Never use a fuel mixture
that has been stored for over 30 days.
WARNING: If 2-cycle lubricant other than
McCulloch Custom Lubricant is to be used, it must
be a premium grade oil for 2-cycle air
cooled
engines mixed at a 40:1 ratio.Do not
use any
2-cycle oil product with a recommended mi-
xing ratio of 100:1.If insufficient lubrication is
the cause of engine damage, it voids the
manufacturer’s engine warranty.
• FUEL AND LUBRICATION
WARNING:
Lack of lubrication voids engine war-
ranty. Fuel and oil must be mixed at 40:1.
WARNING: Remove fuel cap slowly when
refueling.
This engine is certified to operate on unleaded petrol. Before
operation, petrol must be mixed with a good quality 2-cycle air-cooled
engine oil designed to be mixed at a ratio of 40:1. A 40:1 ratio is
obtained by mixing 5 litres of unleaded petrol with 125ml of oil. DO
NOT USE automotive oil or marine oil. These oils will cause engine
damage. When mixing fuel, follow instructions printed on oil
container. Once oil is added to petrol, shake container momentarily
to assure that the fuel is thoroughly mixed. Always read and follow
the safety rules relating to fuel before fueling your unit.
WARNING: Alternative fuels (not petrol) such as
E-15 (15% alcohol), E-20 (20% alcohol), E-85 (85%
alcohol) are NOT classified as petrol and are NOT
approved for use in 2-stroke petrol engines. Use of
alternative fuels will cause problems such as:
improper clutch engagements, overheating, vapor
lock, power loss, lubrication deficiency, deterioration
of fuel lines, gaskets and internal carburetor
components, etc. Alternative fuels cause high
moisture absorption into the fuel/oil mixture leading
to oil and fuel separation.
FUEL REQUIREMENTS
Use good quality unleaded petrol. The lowest recommended octane
grade is 90 (RON).
IMPORTANT
Use of alcohol blended fuels (called gasohol or using ethanol or
methanol) can cause major enging performance and durability
problems.
Fuel & Oil Mix
40:1 (2.5%)
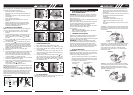
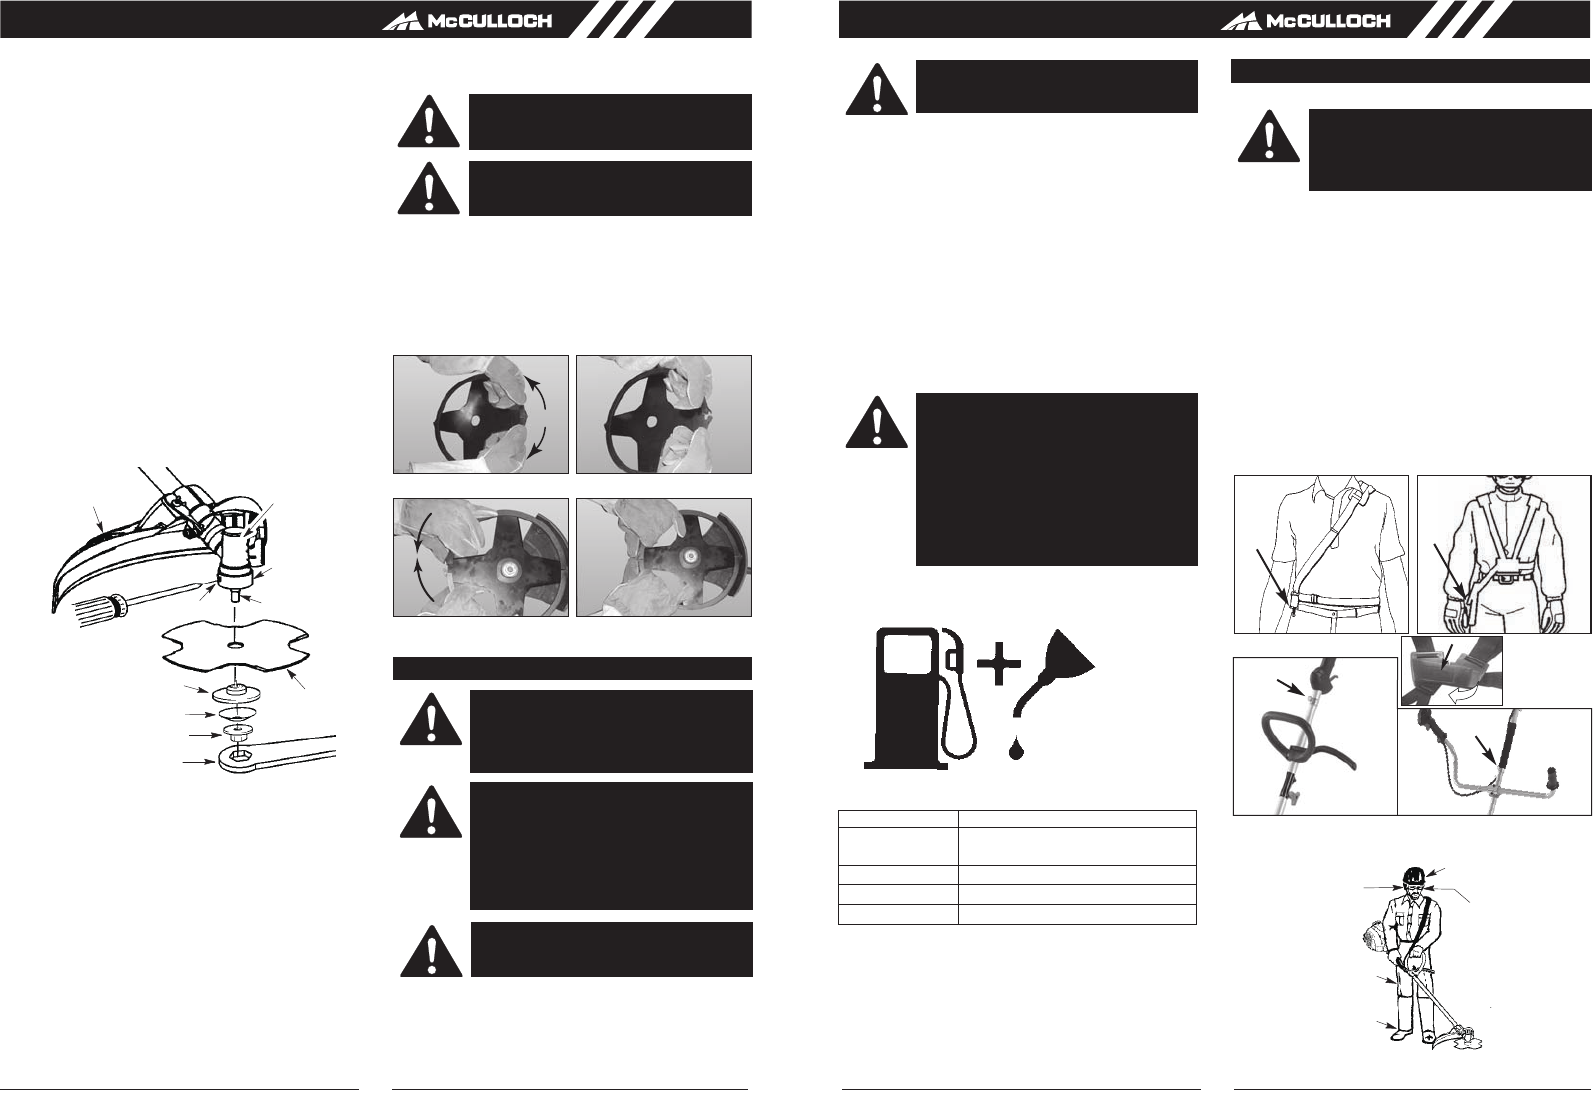
• SHOULDER HARNESS
• OPERATING POSITION
NOTE: When you install the cutting attachment, please
follow the below requirements.
NOTE: Detach the shoulder harness from the unit before
starting engine.
OPERATING INSTRUCTIONS
WARNING: ALWAYS WEAR SHOULDER
HARNESS when operating unit with a blade.
Attach harness to trimmer after starting unit
and engine is running at IDLE. Turn ENGINE
OFF before disconnecting shoulder harness.
GB GB
WARNING: Wear protective gloves when handling or
performing maintenance on the blade to avoid injury. The
blade is sharp and can cut you even when it is not
moving.
WARNING: Do not use any blades, or fastening
hardware other than the washers and nuts shown in the
following illustrations. These parts must be provided by
McCulloch and installed as shown below. Failure to use
proper parts can cause the blade to fly off and seriously
hurt you or others.
NOTE: The dust cup is located on the gearbox shaft and
not in the parts bag. All other fasteners mentioned in the
following assembly steps are in the parts bag.
NOTE: Make sure all parts are in place as illustrated,
and the blade is sandwiched between the dust cup and
the retaining washer. There should be no space between
the blade and the dust cup or the retaining washer.
NOTE: To remove blade, insert screwdriver into aligned
holes. Unthread the nut (clockwise direction) and remove
parts. Be sure to store parts and instructions for future
use.
1. Install the blade and the retaining washer over the
threaded shaft.
2. Make sure the raised part of the retaining washer is
facing the gearbox and the raised area fits into the
hole in the center of the blade.
3. Slide the blade and retaining washer onto the shaft of
the gearbox.
4. Place the cupped washer onto the shaft. Make sure
the cupped side of the washer is toward the blade.
5. Install the blade nut by threading onto the shaft
counterclockwise.
6. Align hole in dust cup with hole in side of gearbox by
rotating the blade.
7. Insert a small screwdriver into aligned holes. This will
keep the shaft from turning while tightening the blade
nut.
8. Tighten blade nut firmly with wrench (provided) while
holding screwdriver in position.
9. Remove the screwdriver.
10. Turn blade by hand. If the blade binds against the
shield, or appears to be uneven, the blade is not
centered, and you must reinstall.
1a. Put the harness on so the shoulder strap is over your
LEFT shoulder.
1b. For Model MB 305 CBS , the shoulder straps are on
your both shoulders. NOTE: Pull the black strip(E) in
order to quickly release the harness from the
operator in the event of emergency. (Fig 8C)
2. Attach the harness clip (C) to the ring (D) mounted on
the shaft (Fig. 8A and 8B and 8D).
3. Adjust length of shoulder strap so trimmer head is
parallel to the ground as it hangs from the strap. A
few practice swings without starting engine should be
made to determine correct balance.
Shield
Blade
Retaining washer
Aligned holes
Cupped washer
Nut
Threaded
shaft
Wrench
Dust cup
Gearbox
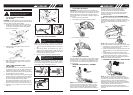
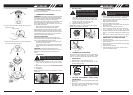
• REMOVE AND INSTALLATION THE BLADE
COVER
1. Before assembling blades, please remove the blades
cover first.
2. Refer figure 6A and Figure 6B, hold the blades cover,
and pull sligtly the cover outward the cover can be
taken apart.
3. Refer to figure 6C and 6D, and assemble in the oppo-
site way to cover the blades.
CAUTION: Before you take apart the blades,
wear gloves to prevent any danger.
CAUTION:When the machine is not in use or
in transportation, make sure blades have
been covered.
A
L
W
A
Y
S WE
A
R:
Hearing
protection
Eye protection
Heavy,
long pants
Boots
Cut from your right to your left.
Sa
f
ety helmet
Fig. 8D
D
MB 305 CBS
Fig. 6A Fig. 6B
Fig. 6C Fig. 6D
Fig. 8A
C
C
MB 305 CBS
D
MT 305 CPS
PUSH
E
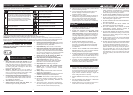
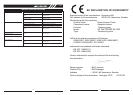
• FUEL / OIL MIXTURE RATIOS
Petrol - Litre Two-Stroke Oil - ml
40:1 (2.5%)
2 50
5 125
10 250