


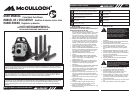


5
6
• FUEL MIXING TABLE
• RECOMMENDED FUELS
Some conventional petrols are being blended with oxy-
genates such as alcohol or an ether compound to meet
clean air standards. Your engine is designed to
operate satisfactorily on any petrol intended for auto-
motive use including oxygenated petrol.
• STARTING A COLD ENGINE
•
STARTING A WARM ENGINE
• IMPORTANT IDLING INFORMATION
• STOPPING THE ENGINE
• BLOWER OPERATIONS
PETROL 40:1
1 U.S. Gal. 3.2 oz. 95ml (cm )
3
5 Liters 4.3 oz. 125ml (cm )
3
1 lmp. Gal. 4.3 oz. 125ml (cm )
3
Mixing Ratio 40 Parts Petrol to 1 Part Lubricant
STARTING/STOPPING INSTRUCTIONS
• OPERATION INSTRUCTIONS
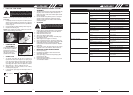
• AIR FILTER
To Clean Air Filter:
1. Loosen knob (A)
holding air filter cover
in place, remove
cover (B) and lift filter
(C) from air box (Fig.
20 & Fig. 21).
2. Wash filter in soap and
water. DO NOT USE
PETROL!
3. Air dry filter.
4. Reinstall air filter and air filter cover.
NOTE: Replace filter if frayed, torn, damaged or unable to
be cleaned.
WARNING: Because of flying debris, always,
approved shielded safety glasses or face
shield when operating blower.
Fig. 16
WARNING: Before using your blower, review
Safety Precautions in your User Manual, and
all regulations for operation of the unit. These
precautions and regulations are for your pro-
tection.
WARNING: DO NOT operate the blower with
other people or animals in the immediate
vicinity. Allow a minimum of 30 feet (10
meters) between operator and other people
or animals.
Fig. 17 Fig. 18
Fig. 19
MAINTENANCE INSTRUCTIONS
CAUTION: NEVER operate blower without
the air filter or dust and dirt will be sucked into
the engine and damage it. The air filter must
be kept clean. If it becomes damaged, install
a new filter.
NOTE: This product is designed to be started at idle.
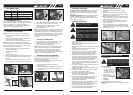
1. Pump primer bulb10 X by pressing up on the bulb
(D). (Fig. 10)
2. Your unit is designed with a 3-position choke: FULL
CHOKE , HALF CHOKE and RUN.
Move choke lever to FULL CHOKE position. (Fig. 9)
NOTE: Easy Start power assist starting significantly
reduces the pulling effort. Pull the starter cord slowly until
fully extended, the power assist will turn over the engine
with little resistence from the engine.
3. Squeeze throttle trigger and turn throttle adjuster
clockwise until it stops.
Throttle adjuster position
(1) Idling
(2) Full Throttle (Fig.11)
4. With the unit on the ground,hold the top assist handle
and step on the bottom of the frame with your foot.
(Fig.12)
Pull starter rope slowly until engine sounds as if it is
trying to start, but do not pull rope more than 6 times.
5. Move choke lever to HALF CHOKE position. (Fig.13)
6. Pull starter rope slowly until engine starts.
7. Allow engine to run 10 seconds; then, move the
choke lever to RUN position.(Fig.14)
8. Press trigger to run.
NOTE: If engine has not started, pull starter rope 5 more
pulls. If engine still does not run, it is probably flooded.
Move the choke lever to the RUN position. Grip starter
handle and pull starter rope slowly rope to clear the
engine of excess fuel. If engine fails to srart after repeated
attempts, refer to troubleshooting section.
1. Move choke lever to HALF CHOKE position. (Fig.13)
2. Pull starter rope slowly until engine starts.
3. Allow engine to run 10 seconds; then, move the
choke lever to RUN position.(Fig.14)
In some cases due to operating conditions (altitude,
temperature etc.) your blower may need a slight
adjustment to the idle speed.
If unit does not idle after restarting 2 times after warm up,
follow these steps to adjust idle.
NOTE: Always pull starter rope straight out. Pulling starter
at an angle will cause rope to rub against the eyelet. This
friction will cause the rope to fray and wear more quickly.
Always hold starter handle when rope retracts. Never let a
rope snap back from extended position. This could cause
rope to snag or fray and also damage the starter
assembly.
1. Locate the idle adjustment screw (G) on the
carburetor (Fig. 15).
2. Using a Phillips or slotted screwdriver - turn screw 1/4
to 1/2 turn clockwise (to the right). Unit should then
idle properly.
Emergency Stopping Procedure. When it is necessary
to stop blower engine immediately, press and hold the
ON/STOP switch (A) until the engine stops completely
(Figure 16).
Normal Stopping Method. For normal stopping, release
trigger and allow engine to return to idle speed. Then
press and hold the ON/STOP switch (A) until the engine
stops completely. (Figure 16)
A
1. Use the blower for trees, shrubs, flower beds, and
hard-to-clean areas.
2. Use the unit around buildings and for other normal
cleaning procedures.
3. Use the blower around walls, overhangs, fences, and
screens.
4. We recommend that a face mask be worn when
operating blower in dusty areas.
5. Stand away from the debris, at a distance that will
easily allow you to control the direction of blown
debris. Never blow debris in direction of bystanders.
6. To control velocity of airstream, blower can be
operated at any speed between idle and full throttle.
Experience with the unit will help you determine the
amount of airflow necessary for each application.
7. Operate power equipment only at reasonable
hours-not early in the morning or late at night when
people might be disturbed. Comply with times listed
in local ordinances.
8. To reduce sound levels, limit the number of pieces of
equipment used at any one time.
9. Operate power blowers at the lowest possible throttle
speed to do the job.
10. Check your equipment before operation, especially
the muffler, air intakes and air filters.
11. Use rakes and brooms to loosen debris before
blowing. In dusty conditions, slightly dampen
surfaces when water is available.
12. Conserve water by using power blowers instead of
hoses for many lawn and garden applications,
including areas such as gutters, screens, patios,
grills, porches and gardens.
13. Watch out for children, pets, open windows or freshly
washed cars, and blow debris safely away.
14. Use intermediate tube plus nozzle of your choice so
the airstream can work close to the ground.
15. After using blowers and other equipment, CLEAN
UP! Dispose of debris in trash receptacles.
1. Follow the instructions “STARTING A COLD
ENGINE”.
2. Once unit is running, place unit on your back by
slipping arms through the shoulder straps as if your
were putting on a jacket (Fig. 17).
3. When preparing to clear an area of debris, always
position yourself so that you can control the direction
debris will be blown. (Fig. 18)
4. The control handle and the flexibility of the blower
tube assembly will allow you to clear the most
hard-to-reach areas .
5. The hand grip, throttle trigger, throttle adjuster and
ignition on/stop switch are all mounted on a swivel
handle that offers a wide range of operating positions
and comfort (Fig. 19).
Fig. 9 Fig. 10
D
Fig. 12
Fig. 11
(1)
Throttle
Adjuster
Throttle
Trigger
START
position
(2)
Fig. 13 Fig. 14
Fig. 15
Fig. 20
Fig. 21
C
GB
GB
G
B
A