


6
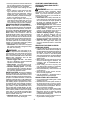
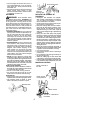
S Keep a good, firm grip on the saw with both
hands when the engine is running and don’t
let go. A firm grip w ill help you reduce kick-
back and maint ain control o f the saw . Keep
the fingers of your left hand encircling and
your left thumb under the front handlebar.
Keep your right han d completely aroundthe
rear hand lewhetheryour arerighthandedor
left handed. Keepyour left ar m straight with
the elbow locked.
S Position yourlefthandonthefronthandle-
bar so it is in astraight linewith your right
hand on the rear handle when making
buckingcuts. Neverreverseright andlef t
hand positions for any type of cutting.
S Standwithyourw eightevenlybalancedon
both feet.
S Stand slightly to theleft side ofthe sawto
keep your body from being in adirect line
with the cutting chain.
S Do not overreach. Y ou could be drawn or
thrown of f balance and lose control of the
saw.
S Donotcutaboveshoulderheight. Itisdif fi-
cult to maintain control of saw above
shoulder height.
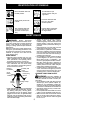
KICKBACK SAFETY FEATURES
WARNING:Thefollowing f eatures ar e
includedonyoursawtohelpreducethehazard
ofkickback; however ,such features w ill n otto-
tally eliminate this dangerous reaction. As a
chain saw user , do not rely only on safety de-
vices. Y ou must follow all safety precautions,
instructions,andmaintenancein t his manua lto
help avoid kickback and other forces which
can result in serious injury.
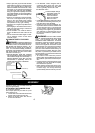
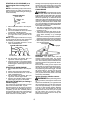
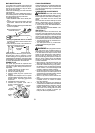
S Reduced--Kickback Guide Bar , designed
wit hasmal lr a di ustipwhi chredu ce sth esize
ofthekickback d angerzoneonthebartip. A
Reduced--Kickback Guide Bar has been
demonstrated to significantly reduce the
number and seriousness of kickbacks.
SmallRadiusTip
ReducedKickback
Symmetrical
GuideBar
SymmetricalGuideBar
LargeRadiusTip
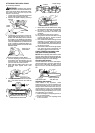
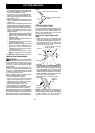
S Low--Kickback Chain, designed with a
contoured depth gauge and guar d link
which deflect kickback force and allow
wood to gradually ride into the cutter.
Low-Kickback Chain
Contoured Depth Gauge
Elongated Guard Link
Deflects Kickback
Force And Allows
Wood To Gradually
Ride Into Cutter
S Handguard, designed to reduce the chance
of your left hand contacting the chain if your
hand slips off the front handlebar.
S Position of front and rear handlebars, de-
signedwithdistancebetw eenhandlesand
“in-line” with each other. The spread and
“in-line” position ofthe hands provided by
this de sign work together to give balance
and resistance in controlling the pivot of
the saw back toward the operator if kick-
back occurs.
WARNING: DO NOT RELY UPON
ANYOFTHEDEVICESBUILTINTOYOUR
SAW. YOU SHOULD USE THE SAW
PROPERLY AND CAREFULLY TO AVOID
KICKBACK. Reduced--kickback guidebars
and low--kickback saw chains reduce the
chance and magnitude of kickback and are
recomm ended.Yoursawhasalowk ickback
chain and b ar as original equipment. Re-
pairsonachainbrakeshouldbemadebyan
authorizedservicingdealer.Takeyourun itto
the place of purchase if purchased from a
servicingdealer,ortot henear estauthorized
master service dealer.
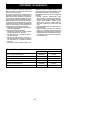
S Tip contact i n some cases may cause a
lightning fastreverse REACTION,kicking
theguidebarupandbackt owardtheoper-
ator.
S Pinchingthesawchainalongthetopofthe
guide bar may push the guide bar rapidly
back toward the operator.
S Eitherofthesereactionsmaycauseyouto
lose control ofthe saw which could result
in serious injury. Do not rely exclusively
uponthes afetydevicesbuiltintoyoursaw.
ASSEMBLY
Protective gloves (not provided) should be
worn during assembly.
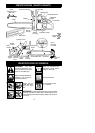
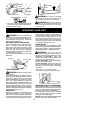
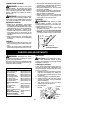
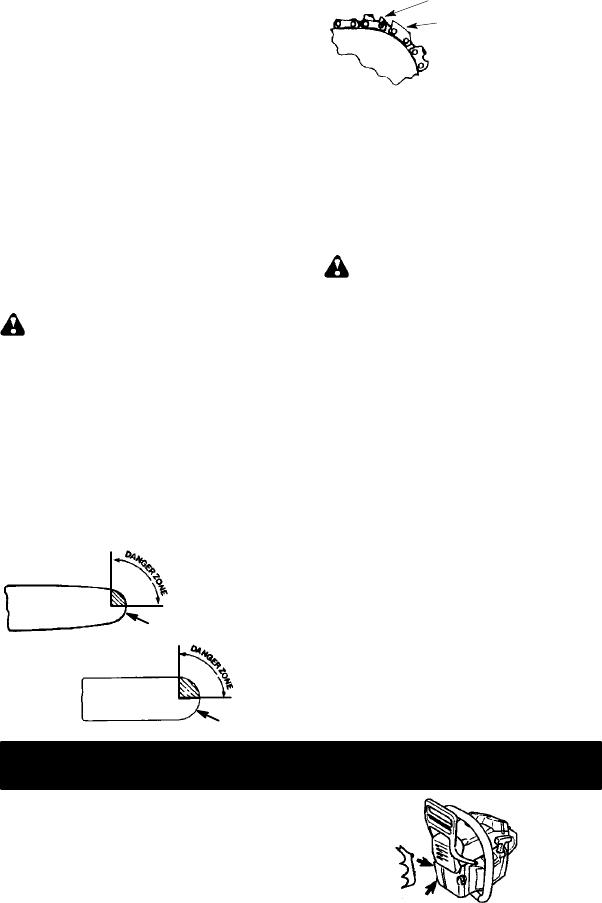
ATTACHING THE BUMPER SPIKE
(If not already attached)
The bumper spike may be used as a pivot
when making a cut.
1. Loosenandremovethechainbrakenuts
and the chain brake from t he saw.
2. Attach the bumper spike with the two
screws as illustrated.