


P 4/ 9
Repair
[3] DISASSEMBLY/ASSEMBLY
[3]-1. Shear Blade Assembly, Gear Complete (cont.)
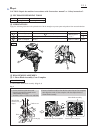
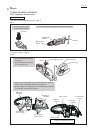
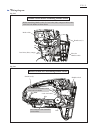
M5x25 Pan head screws (2pcs.)
Shear blade
assembly
Guide plate
Sleeve 5 (1pc. each) in the holes of
Shear blade assembly
Fig. 5
(1) Assemble Flat washer 8 and Ball bearing 608ZZ to the both sides of Gear complete. And then, mount Gear complete
to the machine. (Fig. 4)
(2) Assemble Shear blade assembly. (Fig. 5)
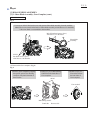
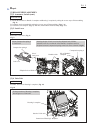
ASSEMBLING
1. Slide Guide plate on Shear blade assembly
to align the holes for M5x25 Pan head screws
with Sleeves 5.
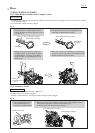
3. Align Crank section of Gear complete to
the elliptical hole of Shear blade assembly
as drawn below. And then, secure Shear
blade assembly by tightening M5x25 Pan
head screws.
4. Make sure that the two shear blades can reciprocate
in order by turning the crank of Gear complete with
slotted screwdriver as drawn below.
2. Pass M5x25 Pan head screws through Sleeves 5
in the holes of Shear blade assembly.
M5x25
Pan head screws
(2pcs.)
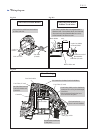
[3]-2. Armature, Switch
Fig. 6
DISASSEMBLING
Holder cap covers
Gear housing complete
1. Remove Holder cap covers
with Slotted screwdriver.
And remove Carbon brushes.
2. Separate Gear housing complete by loosening six 4x25 Tapping screws.
Gear housing complete is separated from Housing set.
Armature comes with Gear housing complete.
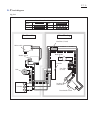
(1) Disassemble Shear blade assembly. (Figs. 2, 3)
(2) Disassemble Gear complete. (Fig.4)
(3) Remove Carbon brushes. And separate Gear housing complete. (Fig. 6)
4x25 Tapping screws (6pcs.)