


9
After use, switch off the controller and disconnect the
connection cord from the shears and the controller. Store
the shears in dry, high or locked-up place – out of reach
of children.
Overload protecting mechanism
Both the shears and the controller are equipped with an
overload protecting mechanism. If the motor is locked for
more than three seconds, this mechanism will actuate to
stop the shears. Also, the pilot lamp on the controller will
start to blink red and green alternately. To resume opera-
tion, switch off the controller by pressing the lower (O)
side of the switch, then switch it on again.
NOTE:
• Do not operate the shears in such a way that this
mechanism actuates frequently. The motor may be
damaged.
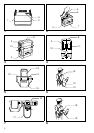
Pilot lamp on controller (Fig. 4)
The pilot lamp will start to blink or remain green when the
controller is switched on (the upper (I) side of the switch
is pressed). If the pilot lamp indicates the following condi-
tions, proceed as follows.
1. If the pilot lamp blinks red and green alternately, the
overload protecting mechanism has been actuated
or the connection cord is not firmly connected.
Switch off the controller and do the following:
a) If the motor is locked for more than three
seconds, just switch on the controller.
b) If the connection cord is not connected firmly,
connect the connection cord firmly and then
switch on the controller.
2. If the pilot lamp blinks red, the inside of the controller
is too hot. Switch off the controller and wait for a
while to cool it down. Then switch it on.
3. If the pilot lamp remains red continuously, the bat-
tery voltage is too low. Charge the battery.
4. If the pilot lamp is neither green or red:
a) The battery is completely discharged. Charge
the battery.
b) The overcurrent relay has actuated. Press the
restart button.
If the pilot lamp does not start to blink green even after
you perform the above procedures, there is something
wrong with the shears, connection cord, controller or bat-
tery. Switch off the controller and disconnect the connec-
tion cord from the shears and the controller. Remove the
controller from the battery. Send the shears, connection
cord, controller and battery to your dealer or a Makita
Service Center to have them inspected and/or repaired.
Replacing shear blades
CAUTION:
• Always be sure that the controller is switched off and
the connection cord is disconnected from the shears.
The shear blades can be replaced irrespective of the
upper shear blade position.
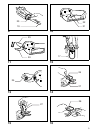
Use the hex wrench provided to remove the two hex
socket head bolts which secure the blade cover. (Fig. 14)
Remove the blade cover. (Fig. 15)
Use the socket wrench provided to remove the hex lock
nut. The flat washer will come off together with the hex
lock nut. (Fig. 16)
Remove the round head bolt, blade holder and upper
shear blade. (Fig. 17)
Remove the upper shear blade from the blade holder. Be
careful not to allow any foreign matter to attach to the
magnet on the blade holder and do not damage it.
(Fig. 18)
Use the hex wrench provided to remove the two hex
socket head bolts which secure the lower shear blade.
Then remove the lower shear blade. (Fig. 19)
To install the shear blades, follow the removal procedures
in reverse. Do not remove grease around the gear.
MAINTENANCE
CAUTION:
• Always be sure that the controller is switched off and
the connection cord is disconected from the shears.
• Never use gasoline, benzine, thinner, alcohol or the
like. Discoloration, deformation or cracks may result.
Blade maintenance (Fig. 20 & 21)
NOTE:
• Before and after operation, check the shear blades
carefully.
After operation, clean off the blades with a stiff brush.
Then wipe the blades with a cloth and coat them with
machine oil.
CAUTION:
• Failure to perform blade maintenance may cause
excessive blade friction and shorten the operating time
per battery charge.
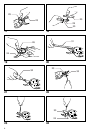
Sharpening blades
Upper shear blade
Apply the flat surface of the diamond file to the blade
edge. Push the diamond file in the direction of the arrow
to sharpen along the entire blade edge. Maintain the
same flat contact with the file consistently along the
entire blade edge. (Fig. 22)
Apply the flat surface of the diamond file lightly to the
reverse side of the blade. Move the diamond file in the
direction of the arrow to remove burrs. (Fig. 23)
Lower shear blade
Apply the round surface of the diamond file to the blade
edge. Push the diamond file in the direction of the arrow
to sharpen along the entire blade edge. (Fig. 24)
Apply the flat surface of the diamond file lightly to the
opposite side of the blade. Move the diamond file in the
direction of the arrow to remove burrs. (Fig. 25)
To maintain product safety and reliability, repairs, mainte-
nance or adjustment should be carried out by Makita
Authorized Service Center.