


8
OPERATING INSTRUCTIONS
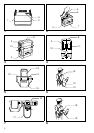
Charging (Fig. 1 & 2)
Charge the battery 4600 with the Makita charger
DC4600 before use. Plug the charger into the power
receptacle and connect the charging plug into the charg-
ing connector on the battery. Press the start button (red)
on the charger. The charging light will come on and
charging will begin. When the charging light goes out
after about one hour, the charging will be completed. If
the charging light goes out within one minute after press-
ing the start button, the battery is dead. Replace it with a
new one. After charging, disconnect the charging plug
from the battery and power receptacle.
CAUTION:
• Remove the controller from the battery when charging.
• Do not keep the start button depressed with tape, etc.
The circuit will not function properly and a malfunction
of the charger may result.
• Use only Makita charger DC4600 to charge the battery
4600. The use of any other chargers may cause dam-
age to the battery.
• When you charge a new battery or a battery which has
not been used for a long period, it may not accept a full
charge. This is a normal condition and does not indi-
cate a problem. You can recharge the battery fully after
discharging it completely a couple of times.
Overcurrent relay (Fig. 2)
The overcurrent relay is built into the battery to prevent a
battery short-circuit. When the overcurrent relay actu-
ates, the battery cannot be used. Press the restart button
on the battery to use it again. If the overcurrent relay
actuates frequently, there may be something wrong with
the battery, charger, controller or shears themselves.
Send them to your dealer or a Makita Service Center to
have them inspected and/or repaired.
Installing controller on battery (Fig. 3 & 4)
First, make sure that the controller is switched off. Install
the controller on the battery and fasten it with the buck-
les.
Connecting connection cord to controller
Connect the male plug of the connection cord to the con-
troller connector and turn the screw clockwise to secure
the male plug in place.
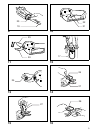
Putting battery into waist belt pocket (Fig. 5 & 6)
After installing the controller on the battery, put the bat-
tery with the controller into your waist belt pocket so that
the controller connector will point toward your hand with
which you operate the shears. Then cover the battery
with the pocket lid to keep them from accidentally falling
out of your pocket during operation.
Wearing waist belt (Fig. 6)
Attach a pair of suspenders on the waist belt. Wear the
waist belt and adjust the lengh of suspenders and waist
belt so that the battery will be positioned on your back at
waist height.
Installing holster (Fig. 7)
Install the holster on the waist belt as shown in Fig. 7. It
should be positioned on the side where your hand oper-
ates the shears.
Wearing arm band (Fig. 8)
Attach the arm band to your arm. When wearing it, slip
the connection cord through the arm band as shown in
Fig. 8 to keep it out of the way.
Connecting connection cord to shears (Fig. 9)
Connect the female plug of the connection cord to the
shear connector and turn the screw clockwise to secure
the female plug in place.
NOTE:
• If you connect or disconnect the connection cord with
the controller switched on, the pilot lamp will blink red
and green alternately. When this occurs, the shears will
not start even if you pull the switch trigger. Switch off
the controller and then switch it on again to start the
shears. (Fig. 4)
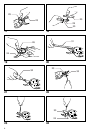
Switch action
CAUTION:
• Before connecting the battery to the shears, always
check to see that the switch trigger actuates properly
and returns to the “OFF” position when released.
• Do not pull the switch trigger without depressing the
lock-off lever. It can cause switch breakage.
Switch on the controller by pressing the upper (I) side of
the switch. The pilot lamp will start to blink green. Then
pull the switch trigger and release it once. The upper
shear blade will start to move up as soon as you release
the switch trigger and will stop at the highest (wide open)
position. In case that the upper shear blade has already
opened, it will keep that position with the first trigger
operation. The pilot lamp will remain green continuously.
From the next trigger operation, you can cut branches.
(Fig. 4)
To prevent the switch trigger from being accidentally
pulled, a lock-off lever is provided. To start the shears,
depress the lock-off lever and pull the switch trigger. To
stop the shears, release the switch trigger. (Fig. 10)
When the switch trigger is pulled and held, the upper
shear blade will move down and stop at the closed posi-
tion. When the switch trigger is released, the upper shear
blade will move up and stop at the highest (wide open)
position. (Fig. 11)
Putting shears in holster (Fig. 12)
Switch off the controller by pressing the lower (O) side of
the switch while keeping the switch trigger pulled. The
upper shear blade will stop at the closed position. Put the
shears in the holster with the upper shear blade at the
closed position.
NOTE:
• Fasten the tool with holster belt.
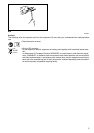
Pruning operation (Fig. 13)
CAUTION:
• Never operate the shears in an awkward posture. This
may cause a serious injury.
• Never hold the branch you are pruning with your free
hand. Keep your free hand away from the cutting area.
The blades are very sharp and you may cut yourself.
Cut branches one by one as shown in Fig. 13. The maxi-
mum thickness of branches which can be cut with these
shears is about 30 mm. Maintain your proper footing and
balance at all times.