


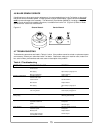
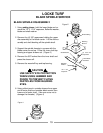

4-3 SPINDLE BELT ADJUSTMENT
Belt tensions should be checked every 40 hours to get
maximum life from drive belts and best performance form
the cutter. Belt tension is adjusted by increasing or de-
creasing the length of the spring on the moveable idlers.
For proper belt tension on the mower, the spring
lengths should be set at 2-7/8”. To adjust the spring
length, loosen or tighten the 1/2" hex nuts on the spring
adjustment rod until the correct spring length is reached.
4-4 SPINDLE BELT REPLACEMENT
Use only genuine Locke Turf replacements
parts. It is not necessary to replace both belts if only one
is worn.
A. Flip up black latches and remove right and left
side shields. To remove the outside shields on the
wing cutter decks, the wings must be in the folded po-
sition.
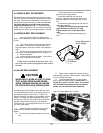
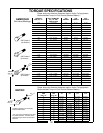
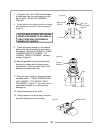
B. Relieve spring tension by loosening the two 1/2"
hex nuts on each spring adjustment rod. (Figure 4-2)
C. Remove old belts.
D. Install new belts as shown below. (Also refer to
the decal on underside of belt shield)
1.Belts must be installed at the same time. One
belt cannot be installed and tightened down before
the other.
1. Place both belts into their respective
grooves on the driving sheave.
2. Work the lower belt over the other
sheaves. After the lower belt is in place, com-
plete the installation of the upper belt. (Figure
4-3)
3. Connect the upper adjustment rod and the
upper idler assembly.
4. Tighten the compression springs on the
upper and lower drives to 2-7/8” long.
Tighten the jam nuts on the adjustment
rods.
5. Replace all shields before operating ma-
chine.
13
Driving Sheave
At Gearbox
Lower Adjustment
Rod & Spring
2-7/8"
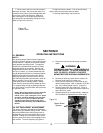
4-5 BLADE REPLACEMENT
WEAR HEAVY WORK GLOVES TO PRO-
TECT HANDS FROM SHARP EDGES.
WHEN TURNING BLADES, BE AWARE
OF OPPOSITE BLADE APPROACHING.
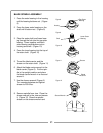
A complete spare set of blades comes with the cutter.
The lower blades are pinned on the frame and the up-
per blades are stored in the tool box. (Figure 4-4)
Always replace all (4) blades on an assembly to retain
balance. In addition to replacing blades when they
become worn and dull, they should also be replaced if
the uplift angle on the trailing side of the blade be-
comes worn off. As the angle wears down, the mulch-
ing action deteriorates.
A. Raise the cutter using the tractor hydraulic
system and use transport locks before changing
blades.
B. Turn off tractor, set parking brake and remove
key.
C. Remove bolt and Belleville washer securing
bottom blade to spindle. Remove blade. Shaft washer
will come off with the blade.
D. Install the blade washer over the spindle
shaft. Install the bottom blade and torque the 1/2" –
20 UNF Gr. 8 bolt to 76 ft./lbs. Note: The concave
side of the Belleville washer must be toward the
blades. Do not substitute with a flatwasher.
Figure 4-4 Spare Blades and Tool Box
CAUTION