


V. MAINTENANCE
1
. Read care and safety instructions carefully before
attempting to use this trimmer. Only after you are
familiar with your hedge trimmer and all of its controls
and the functions should you start the trimmer.
2. Before plugging into an electric circuit, be sure that the
voltage supply is as specified on hedge trimmer.
Models 1910, 1920, 2410, 2420, 3010, 3020 are rated at
464 watts at 115 volts.
M
odels 1912, 1922, 2412, 2422, 3012, 3022 are rated at
390 watts at 230 volts.
3. Be sure the switches are in the “off” (not depressed)
position before connecting unit to the applicable
current. (120V AC or 220V/240V AC.) Do not carry a
plugged -in trimmer with a finger on the switch.
4. The electricity for this hedge trimmer should be
supplied through a Residual Current Device (RCD) with
a tripping current of not more than 30 mA. These
protective devices are also known as Residual Current
Circuit Breakers (RCCBs) or Earth Leakage Circuit
Breakers (ELCBs).
5. Keep extension cord behind trimmer. Never drape
e
xtension cord over hedge being trimmed. On 120V
units, use 16 gauge wire extension cord up to 100 feet.
Over 100 feet use 14 or heavier gauge wire or extension
cord. Cords are available from your local Little Wonder
dealer. The use of light gauge lamp cords or sizes lighter
than those specified above will result in loss of power,
possible motor failure, overheating of cord and the
possibility of fire.
6
. Warning! These trimmers have been designed so they
can only be operated when using both hands. Do not
attempt to override this important safety feature in any
way.
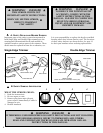
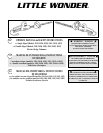
7. Hold trimmer firmly. For Single Edge Model, keep right
hand on side handle and left hand on rear handle. For
Double Edge Model, you can place either hand on either
handle. Squeeze both switches.
Tilt trimmer so cutting tooth is angled slightly toward
the hedge or shrub and proceed to cut. Use
overlapping sweeping motions away from your body to
achieve a safe and even cut. The unit is designed
to cut any type of hedge or shrub; however,
thickness of cut should not exceed 1/2 inch
in diameter.
1/2"
Remove the plug from the socket before carrying out any adjustment, servicing, or maintainence.
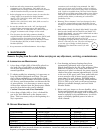
B. SERVICE MAINTENANCE GUIDE
Area
Gear Housing
Blades
Fasteners
Labels
Handles
Guards / Safety Devices
Maintenance
Check Grease
Inspect / Clean / Lubricate
Inspect / Tighten / Replace
Inspect / Replace
Inspect / Replace
Inspect / Replace
Frequency
Monthly
After Each Use
Before Each Use
Before Each Use
Before Each Use
Before Each Use
IMPORTANT- Time intervals shown are maximum. Actual use and your experience will determine the
frequency of required maintenance.
7
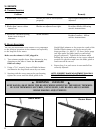
1. A few drops of light (#10) oil should be placed on
the back edge of each blade at each adjusting
screw after approximately every four hours of
normal operation.
2. To obtain trouble free trimming, it is necessary to
keep the blades lubricated and clean. The gum
that collects and builds up on the blades can be
removed with 50-50 mixture of kerosene and #10
oil. Since a petroleum product can shorten the life
of some plastics, it is necessary to remove excess
oil-kerosene mixture from the plastic parts. Blades
must be clean before they can be adjusted.
Caution! Kerosene and oil are flammable.
3. A few drops of light (#10) or 3-in-1 oil should be
put in the hole indicated on the bottom cover
plate. This is necessary only at the beginning of a
day’s operation.
4. Gear housing and motor bearings have been
permanently lubricated with a special grease
which should last for the life of the trimmer. When
blades are replaced, or any other time that the
bottom cover plate is removed, the grease must be
checked for proper amount (approximately 3/4 full
in the area of the gears), and a new gasket and new
screws must be used to insure proper seating of
cover plate. Use only Lubrico M3-3K9K grease
(P/N 16-78A) in the gear housing. Lubrico M24M
(P/N 16-78B) is to be used on the motor bearings.
Lubrico is available through your local Little
Wonder Dealer.
5. Before each use, inspect to be sure handles, safety
devices and fasteners are secure and in place, and
cord is not frayed. If the supply cord is damaged, it
must be replaced by the manufacturer, its service
agent or similarly qualified person in order to
avoid a hazard.
A. LUBRICATION AND MAINTENANCE