


8
Section 2 Operating
SPS20 & SPS30 Series Pulverizer Seeders 313-242M
6/26/02
Land Pride
to a lower gear.
Parking
The following steps should be done when preparing to
store the seeder or unhitch it from the tractor. See also
“Section 4 Maintenance and Lubrication” on Page 20
for additional information on long term storage of your
seeder.
1. Park the seeder on a level, solid area.
2. Shut off tractor engine and engage parking brake.
3. Unhitch from tractor.
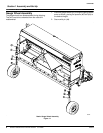
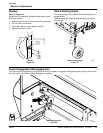
Drive System
Your Pulverizer Seeder uses standard no. 40 roller chain
throughout its drive system. The drive system is simple
and designed for low maintenance.
1. Check the drive idler arms to insure that they are
taking up any excess chain slack.
2. Check each chain to insure that it is not over-tight.
3. Annually clean and lubricate chain with chain oil.
Operating Instructions
Prior to putting your Land Pride Pulverizer Seeder into
service you must thoroughly review the Operator’s
Manual. You will also need to properly attach your seeder
to the tractor, and completely and properly perform all
functions identified in the Operator’s Checklist. Once you
have performed the tractor attachment and Checklist
functions, you are ready to proceed with final seeder
calibration and use.
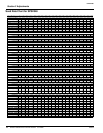
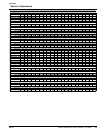
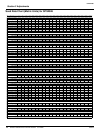
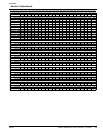
In performing your Operator’s Checklist functions, you
should have already determined the proper seed rate
setting for the seed you are applying. This will always be
determined from the seed rate chart located either in your
Operator’s Manual or under the hopper lid of your seeder.
You should have chosen the proper "speed rate sprocket
selection", properly positioned the levers on your seed
cups, and properly positioned your seed rate handle. In
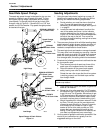
order to perform final calibration, you will need to raise the
seeder off the ground, safely supporting the unit so the
rear roller can rotate freely.
Engage the seeder drive clutch and rotate the rear roller to
makesure the drivesystem is working properly. Make sure
that the seed cups are free of foreign matter. Place a drop
cloth under one end of the seeder to catch the seed that
will be metered out for calibration purposes. Placeseveral
pounds of seed in the hopper directly over the last three
seed cups at the outboard end you are monitoring. Make
sure that no seed can flow from any other seed cups at this
time.
If you have a 72" seeder, you will need to rotate the rear
roller exactly 62 rotations to simulate 1,000 square feet of
coverage. If you have a 48" seeder you will need to rotate
the rear roller exactly 88 rotations to simulate 1000 square
feet of coverage. Once you have completed the proper
number of rotations,gather up the seed you havecaptured
in your drop cloth and weigh it. Divide this number by
three, which represents how much seed is coming out of
each seed cup for 1,000 of coverage. Multiply that figure
by the total number of seed cups on your seeder to
determine how many pounds you are actually putting
down for 1,000 square feet of coverage. If the results are
not what you expect or do vary greatly from suggested
settings on the chart, re-verify your settings and repeat the
calibration process.
Once you are satisfied with your calibration settings, load
the seed hopper and head for the planting site. You should
have already removed any sizeable sticks, rocks, or
extraneous debris from this area. Make sure the seeder
drive clutch is engaged. It is best to start out slow to make
sure that all systems are working properly. Seeding and
pulverizing action will commence as soon as the rear roller
touches the ground and begins to roll. You can increase
your speed when you are confident that you are achieving
the desired results. Seeding will stop when you lift the unit
off of the ground.
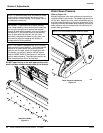
If you need to increase or decrease the cultivating action
of the scarifiers, you can do this by raising or lowering the
front mounted pneumatic gage wheels. Down pressure of
the rear pulverizing roller can be adjusted by the spring
tensioners located at both ends of the roller. If you are
getting a build-up on the either the gage wheels or the rear
roller, seeding operations should be discontinued until the
ground is dry enough to work. If the ground needs more
cultivation than can be achieved in one pass, disengage
the seeder drive clutch and make additional passes using
the scarifier and pulverizer only.
Once you are finished using your seeder, make sure you
empty out the hopper, disengage the clutch, and clean out
the seed cups. Park it on a dry and level surface and make
it ready for the next use.
With a little practice you will achieve professional results
from your Land Pride Pulverizer Seeder.