


17
Section 5: Maintenance & Lubrication
6/06/06
PR2572 & PR2596 Powered Rakes 314-132M
Land Pride
Table of Contents
Maintenance
Proper servicing and adjustment is the key to the long life
of any implement. With careful and systematic
inspection, you can avoid costly maintenance, time and
repair.
After using your Rotary Cutter for several hours, check
all bolts to be sure they are tight.
Replace any worn, damaged or illegible safety labels by
obtaining new labels from your Land Pride Dealer.
!
CAUTION
BEFORE any maintenance ispreformed,lower the power rake
to the ground, stop tractor engine and remove key. DO NOT
attempt to make maintenance adjustments while tractor is
running.
Storage
At the end of the working season or when the powered
rake will not be used for a long period, it is good practice
to clean off any dirt or grease that may have accumulated
on any of the moving parts.
Check the roller cutting bars for wear and replace the
roller if necessary.
Inspect the powered rake for loose, damaged or worn
parts and adjust or replace if needed.
Lubricate as noted in “Lubrication” above.
Repaint parts where paint is worn or scratched to prevent
rust.
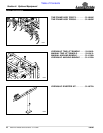
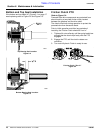
Drain gearbox and chaincase oil. Drain oil in gearbox by
removing the bottom drain plug on. Drain oil in chaincase
by removing cover (#1) Figure 1-10. Be sure to refill
gearbox and chaincase at this time.
Take the pressure off the hydraulics cylinders and hoses
if the powered rake is equipped with the optional
hydraulic angling or tine lift.
Apply a light coat of grease to all exposed hydraulic
cylinder rods.
Store powered rake in a clean, dry place.
Drive Chain Maintenance
The operator should check periodically to make sure that
the drive chain is tight. If adjustment is needed refer to
“Drive Chain Adjustment” on page 14.
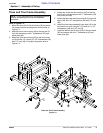
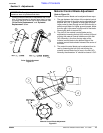
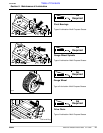
Sprocket and Chain Replacement
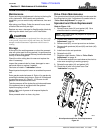
Refer to Figure 1-10:
1. Remove cover plate (#1) and gasket (#2). Care
should be taken in removing gasket.
2. Loosen chain tension. Refer to “Drive Chain
Adjustment” page 14.
3. Remove nuts (#3), one on top and one on bottom.
4. Remove both sprockets (#4) and (#5) and chain (#6)
altogether.
5. Install new chain and sprockets.
6. Reinstall nuts (#3).
7. Retighten chain tension. Refer to “Drive Chain
Adjustment” on page 14.
8. Turn the roller several turns and observe the chain to
make sure everything is working properly.
9. Reinstall cover plate (#1) and gasket (#2).
10. Check the oil level in the chain case. See
“Lubrication” on page 21.
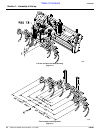
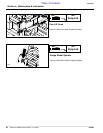
Drive Sprocket and Drive Chain Replacement
Figure 5-1
NOTE: Oil in chain case! Be prepared to capture oil
when taking cover off.
15833
Section 5: Maintenance & Lubrication