


2
Manual No. 701-149M 06/21/07
Land Pride
Assembly Instructions
■
!
CAUTION
TO AVOID PERSONAL OR OTHER INJURY:
1. READ BLADE OWNER’S MANUAL, MACHINE’’’S
OPERATOR’S MANUAL, AND SAFETY DECALS
BEFORE OPERATING.
2. WEAR HEAD PROTECTION, SAFETY GLASSES,
AND SHOES AS RECOMMENDED IN ATV
OPERATOR’S MANUAL.
3. ALLOW NO RIDERS ON BLADE OR MACHINE
WHILE MOVING OR STATIONARY.
4. KEEP BYSTANDERS AWAY FROM BLADE AND
ATV WHILE MOVING OR STATIONARY.
5. BEFORE ADJUSTING BLADE ANGLE, STOP THE
MACHINE’S ENGINE, SET AND LOCK BRAKES,
RAISE BLADE. DO NOT ATTEMPT TO RAISE
BLADE BY HAND; USE THE LIFT ONLY.
6. BEFORE ADJUSTING BLADE HEIGHT: LOWER
BLADE TO THE DOWN POSITION.
7. WHEN BLADE IS NOT IN USE, STOP THE
MACHINE’S ENGINE, SET AND LOCK BRAKES,
AND LOWER BLADE TO DOWN
!! ! OPERATION! ! !
** Your blade and hardware were designed with your
safety in mind. In order to protect you and your machine,
certain parts of the blade and / or hardware are designed
to fail when the equipment is over stressed. For this
reason Push Tubes, Blade Hinges, Push Plate Attaching
Pins and Clevis Pins are not covered by Warranty.
* Blade angle is adjustable. Raise blade. To move the
blade left, right or straight, pull the Blade Position Lever
ahead and turn the blade to the desired position. The
Lever will spring back when the blade is at the correct
angle.
* The blade skids are adjustable so the blade can be
lowered but still held a certain distance off the ground.
* The blade is designed to trip when it strikes an object or
digs in too far. When pressure is released the blade
springs back into position. Blade spring tension may be
set stiffer by tightening the Locknuts on the bottom of the
Eyebolts. For less spring tension, loosen the Locknuts.
* Do not exceed 5 MPH with blade installed.
* Operate with extreme caution on slopes, steep grades
and rough terrain.
* Keep away from blade and moving parts during
operation.
!
WARNING
! Due to reduced ground clearance, remove plow Mount
Brackets before trail riding.
! Do not exceed 5 MPH with the blade or its brackets
installed
OPERATION TIPS
When plowing snow ordirt into apile, back away fromthe
pile before attempting to raise the blade
! For best results set the suspension to the stiffest setting
if possible
! The Blade is shipped with the Blade Skids mounted
upside down for boxing. Be sure to mount the Skids
properly before using your blade.
MAINTENANCE
! Periodically check for wear and tightness of all bolts,
nuts and fasteners. Replace or tighten as necessary.
NOTICE
! The use of Blade Lift Kits Not Manufactured by Land
Pride with Work Power Blades will void all warranties.
! The Land Pride Blade Lift Kits are specifically designed
to help prevent damage to the Blades, Lift Kits and the
machine.
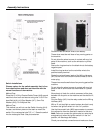
! PREPARATION:
Using the Parts List and Parts Drawing included, verify
that you have received all the components of the 701-
069A Electric Lift Kit.
NOTE: The MACHINE needs to be on a level surface.
All directions referring to the right and the left are when
the operator is sitting on the machine.
Numbers in parenthesis refer to item numbers on the
parts list and parts drawing at the end of the instructions
Assembly Instructions
A detailed listingof parts for thisaccessory kit is provided
on page 6. Use the list as a checklist to inventory parts
received. Please contact your local Land Pride dealer for
any missing hardware.
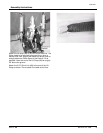
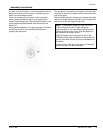
Using the two 3/8" x 1" bolts (#12) and Nylock Nuts
supplied, securelyfasten the Electric LiftAssembly to the
U608 Blade Position Lever Bracket as shown below.