


17
Section 4: Maintenance and Lubrication
3/21/07
FM3188 & FM4188 Flail Mowers 309-523M
Land Pride
Table of Contents
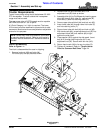
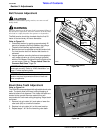
FM3188 Cutting Knife Replacement
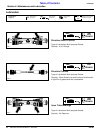
Refer to Figure 4-3:
The cutting knives have a cutting edge on both the
leading and trailing edges. When the leading edge wears
out, turn existing pair of knives around 180 degrees and
reinstall. Replacement knives should be the same length
as existing knives to maintain rotor balance.
1. Remove nylock nut (#1), bolt (#2) and spacers (#3).
2. Remove existing cutting knives (#4) or turn existing
pair of knives around 180 degrees and reinstall.
3. Install cutting knife with existing bolt, spacers and
nylock nut.
4. Tighten nylock nut to proper torque as listed in the
"Torque Values Chart" on page 24.
Fine Cutting Knives (FM3188 Only)
Figure 4-3
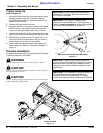
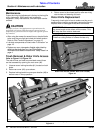
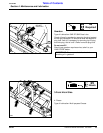
FM4188 Hammer Knife Replacement
Refer to Figure 4-4:
Replacement knives should be the same length as
existing knives to maintain rotor balance.
1. Remove nylock nut (#1) and bolt (#2).
2. Remove old hammer knife (#3) and install new knife
with existing bolt and nylock nut.
3. Tighten nylock nut to proper torque as listed in the
"Torque Values Chart" on page 24.
Hammer Knives (FM4188 Only)
Figure 4-4
24985
1
2
4
3
1
2
3
24869
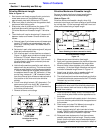
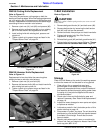
V-Belt Installation
Refer to Figure 4-5:
!
CAUTION
Belt drive system is under spring tension; use care to avoid
bodily harm!
1. Remove belt guard fender (#1) and belt cover (#2).
2. Remove belt tension by loosening the belt tension
bolt (#3) until belt can be removed.
3. Remove old belts from pulleys and install new belts.
4. Tighten belt tension bolt. See “Belt Tension
Adjustment” on page 15.
5. Reinstall belt guard (#2) and belt guard fender (#1).
6. Tighten bolts to the proper torque. Refer to “Torque
Values Chart for Common Bolt Sizes” Page 24.
Belt Installation
Figure 4-5
Storage
Clean the Flail Mower at the end of the working season
or when the mower will not be used for a long period.
1. Clean off any dirt or grease that may have
accumulated on the mower and moving parts.
Scrape off compacted dirt from under the hood and
then wash the surface thoroughly with a garden hose.
A coating of oil may also be applied to the area to
minimize oxidation.
2. Check rotor knives and knife bolts for wear and
replace if necessary. See “Rotor Knife Replacement”
on page 16.
3. Inspect for loose, damaged or worn parts and adjust
or replace as needed.
4. Lubricate as noted in the Lubrication portion of this
section starting on page 18.
5. Store mower in a clean, dry place. The unit should be
positioned on a flat surface with jack stands lowered
to suitable 3-Point height. Ensure that the main
frame is stable.
6. Repaint parts where paint is worn or scratched to
prevent rust. Ask your dealer for Aerosol Land Pride
touch-up paint #821-011C.
24865
2
1
3