


7
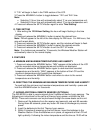
2. “12h” will begin to flash in the TIME section of the LCD
3. Press the MIN/MAX/+ button to toggle between “12h” and “24h” time.
Note:
• Selecting 12 hour time will automatically select °F as your temperature unit.
• Selecting 24 hour time will automatically select °C as your temperature unit.
4. Press and release the SET/CH button again to enter Time Setting.
D. TIME SETTING
1. After exiting the 12/24 Hour Setting, the hour will begin flashing in the time
display.
2. Press and release the MIN/MAX/+ button to select the desired hour.
Note: PM will appear to the left of the time display for PM hours. For AM hours, that
area will remain blank.
3. Press and release the SET/CH button again, and the minutes will begin to flash.
4. Press and release the MIN/MAX/+ button to select the desired minutes.
5. Press and release the SET/CH button to exit the SET UP mode.
Note: If no buttons are pressed for 10 seconds, the Wireless Weather Station will
automatically return to the normal display.
II. FEATURES
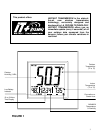
A. MINIMUM AND MAXIMUM TEMPERATURES AND HUMIDITY
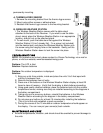
1. Press and release the MIN/MAX button, “MIN” appears at the bottom of the LCD
and the recorded minimum temperatures and humidity are displayed.
2. Press and release the MIN/MAX button again to view maximum recorded
temperatures and humidity. “MAX” appears at the bottom of the LCD and the
maximum temperatures and humidity are displayed.
3. Press and release the MIN/MAX button once more to return to the current
temperatures and humidity.
B. RESETTING THE MINIMUM AND MAXIMUM TEMPERATURES AND HUMIDITY
To reset both the minimum and maximum temperatures and humidity—press and
hold the MIN/MAX button for 5 seconds.
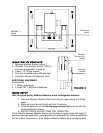
C. ADDING ADDITIONAL REMOTE SENSORS (OPTIONAL)
The WS-8300U is able to receive signals from 2 additional thermo-hygro sensors . The
following are instructions for the set-up of thermo-hygro sensor units with the WS-
8300U. These extra sensors can be purchased through the same dealer as this unit.
1. Remove all the batteries from the receiver and sensor(s) and wait 60 seconds.
During these 60 seconds, press any button 20 times to discharge any excess
power.
2. Insert the batteries to the first Thermo-hygro sensor.
3. Within 2 minutes of powering up the first sensor, insert the batteries to the
Weather Station. Once the batteries are in place, all segments of the LCD will
light up briefly. Following the indoor temperature and the time as 12:00 will be