


7
Note: For best performance, standard alkaline batteries should be replaced at least once every 2 years to
maintain the best running accuracy. Ensure that the batteries used are new and the correct size.
Please help in the preservation of the environment and return used batteries to an
authorized depot.
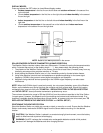
RESTART AFTER STATION HAS BEEN RUNNIING:
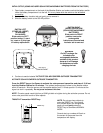
DISTANCE: For best results, please bring the outdoor sensor in the house and place 5-10 feet from the
display unit.
REMOVE POWER: Remove the battery from Weather Station. Place battery switch to Alkaline Battery
mode. Do not attempt to remove batteries from solar sensor.
DISCHARGE ELECTRICITY: With the power source removed, press one of the buttons on the display at
least 20 times to clear all stored power. Please do this even if the display is blank to remove any
remaining power. Verify the display is blank.
FACE DOWN: Place the display face down on a clean cloth to prevent the solar panels from providing
power.
UNPOWERED FOR 15 MINUTES: It is important for the display to remain without power for at least 15
minutes.
NOTE: Failure to allow a display to rest for 15 minutes can result in failure to connect with the outdoor
sensor or missing segments on the display.
SENSOR FIRST: GENTLY PUSH the RESET button on the TX62U-IT sensor. All LCD segments will light
up briefly. The code number and the security code ('20' for example) of the model will be displayed
followed by the battery voltage will be shown on the LCD then the current temperature.
NOTE: Voltage needs to be higher than 2.5V to maintain normal operation. If the voltage is below 2.5V,
place the TX62U-IT in a window in the full sun for a day or two.
DISPLAY NEXT:
NOTE: Start with the Battery Switch in the Battery position.
***RECHARGEABLE ALKALINE BATTERY (charged by solar panel): Install Alkaline Rechargeable
battery. After powering up the solar clock, all LCD segments will light up briefly and it will show the time
(12:00), indoor temperature, date, and indoor humidity.
SOLAR MODE: Switch to Solar mode.
CONNECTION: Allow the sensor and display to remain 5 feet apart for 15 minutes to establish a
strong connection. Do not press buttons at this time. You should see a reading on the outdoor
temperature area in the first minute. After 15 minutes, return the sensor outside.
OR
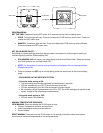
****PLAIN ALKALINE BATTERY:
BATTERIES: Please be sure you are using fresh batteries tested to a minimum of 1.48, on a voltmeter
that reads in numbers.
DISPLAY NEXT: Install batteries into the display according to the diagram in the battery
compartment. After powering up the solar clock, all LCD segments will light up briefly and it will show the
time (12:00), indoor temperature, date, and indoor humidity
BATTERY MODE: Leave switch on Battery mode.
CONNECTION: Allow the sensor and display to remain 5 feet apart for 15 minutes to establish a
strong connection. Do not press buttons at this time. You should see a reading on the outdoor
temperature area in the first minute. After 15 minutes, return the sensor outside.