


6
Kohler Co., Kohler WI U.S.A.
110050-2-AB
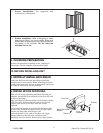
C. PROTECT BATH UNIT
Position a clean drop cloth or similar material in the
bottom of the whirlpool. Be careful not to scratch the
surface of the product.
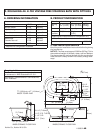
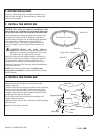
7. INSTALL THE WOOD RIM
NOTICE: The wood rim must be installed to the
bath before any framing is built around the bath.
Do not use this wood rim in sunken installations.
Install the bath, and make the drain connections. Use
two people for this procedure. Hold the wood rim in
position under the bath rim. Install the angle brackets
to the wood rim, as illustrated, using #10 x 3/4"
roundĆhead screws. The holes are preĆdrilled in the
wood rim. Apply a bead of clear silicone sealant, as
shown.
CAUTION:ĄOption for using silicone
sealant: Do not let the bath rest on the rim, or
damage to the wood rim and the bath will result.
The bath must be supported by the legs.
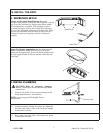
Install the bolts into the angle brackets, as shown, to
install the wood rim to the bath. Loosely assemble all
the components. Tighten the bolts when they are
threaded into the bosses on the underside of the rim.
The bath is now ready for framing, and the installation
of the wall material.
NOTE: The bottom of the wood trim Option for
using silicone sealant: be sealed with a bead of clear
silicone sealant.
Bath Rim
Wood Rim
Apply Silicone Sealant
Screw
Bolt
Wood Rim
Rim Bracket Locations
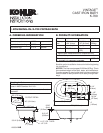
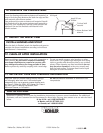
8. INSTALL THE TOWEL BAR
Attach the two end brackets to the bath rim with
washers and bolts.
Carefully slide the two support brackets on the towel bar.
Do not scratch the towel bar. Position one end of the
towel bar into an end bracket, and attach the support
brackets to the bath rim with washers and bolts. Only
handtighten the bolts at this time.
Fit the other towel bar end into the remaining end
bracket. Align as needed.
Tighten all bolts. Secure the towel bar to all the brackets
with setscrews.
Repeat for the other towel bar.
End Bracket
Setscrew
Bath Rim
Support Bracket
Setscrews
Towel Bar
Bolt
Washer
Washer
Bolt