


Dealer Service 21
5WPMAN0705 (Rev. 5/9/2008)
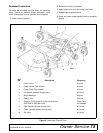
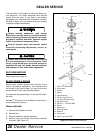
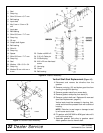
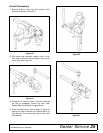
Disassemble Spindle
1. Remove bolt (1) and washer (2) from the top of the
spindle.
2. Remove sheave (3) and spacer (4).
NOTE: A wheel puller may be needed if sheave
can not be removed by hand. Retain key (11).
3. Slide shaft assembly (12), lower bearing (5), and
long spacer (10) out the bottom of spindle housing
(8).
4. Remove upper bearing (5) and spacer (4) from top
of spindle housing.
5. Inspect parts and replace as needed.
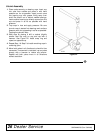
Assemble Spindle
1. Slide lower bearing (5) over shaft assembly (12)
with seal down.
2. Slide long spacer (10) on shaft assembly.
3. Insert shaft assembly with bearing and spacer into
spindle housing from the bottom.
4. Install upper bearing (5) over shaft with the seal
facing up.
5. Install spacer (4) and sheave (3) over shaft.
6. Align keyways in shaft and sheave and insert key
(11).
7. Install washer (2), and bolt (1). Torque bolt to 35
lbs-ft.
8. Rotate sheave and check for free movement.
9. Lubricate spindle.
GEARBOX REPAIR
Read this entire section before starting any repair.
Many steps are dependent on each other.
Fill gearbox with SAE 80W or 90W gear lube until it
runs out the side level plug.
Repair to this gearbox is limited to replacing bearings,
seals, and gaskets. Replacing gears, shafts, and a
housing is not cost effective. It is more economical to
purchase a complete gearbox if repair to anything other
than replacement of bearings, seals or gaskets is
required.
Inspect gearbox for leakage and bad bearings.
Leakage is a very serious problem and must be cor-
rected immediately.
Bearing failure is indicated by excessive noise and side
to side or end play in gear shafts.
Seal Replacement
Recommended sealant for gearbox repair is Perma-
tex
®
Aviation 3D Form-A-Gasket or equivalent.
Leakage can occur at the vertical or horizontal gaskets
and shaft seals.
Leakage at the horizontal gasket or seal can be
repaired without removing the gearbox from the mower.
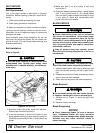
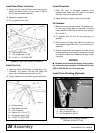
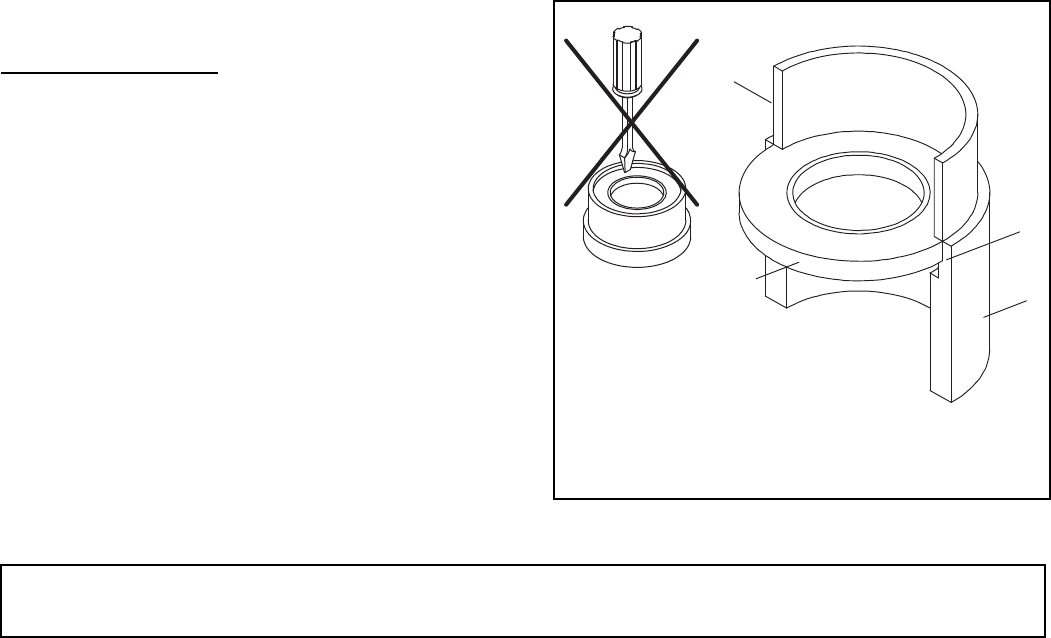
Seal Installation
NOTE: Proper seal installation is important. An improp-
erly installed seal will leak.
1. Clean area in housing where seal outer diameter
(OD) seats. Apply a thin coat of Permatex.
2. Inspect area of shaft where seal seats. Remove
any burrs or nicks with an emery cloth.
3. Lubricate gear shaft and seal lips.
4. Place seal squarely on housing, spring-loaded lip
toward housing. Select a piece of pipe or tubing
with an OD that will sit on the outside edge of the
seal but will clear the housing. Tubing with an OD
that is too small will bow seal cage and ruin seal.
5. Carefully press seal into housing, avoiding
distortion to the metal seal cage.
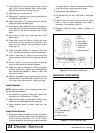
Figure 13. Seal Installation
2
3
4
CD1094
1
1. Seal
2. Pipe or tube
3. Seal seat
4. Casting
Pipe or tube must
press at outer edge of seal
CD1092
Incorrect
Installation