


To replace belts do the following:
1. Remove belt shields. Clean foreign material from the mower deck and belt area.
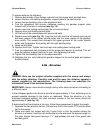
2. Loosen the four nuts holding the gearbox support plate to the central plate.
3. Loosen the two blocking nuts on the adjustment bolt.
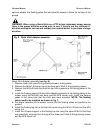
4. Turn the adjustment bolt counter clockwise, pushing the gearbox support plate
forward until all tension is released (see fig. 12).
5. Loosen rear nuts holding central plate (do not remove them).
6. Remove front nuts holding central plate.
7. Lift the front of the central plate and remove old belts.
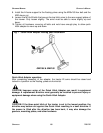
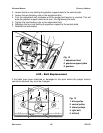
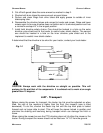
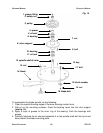
8. Replace new belts (see fig. 13). Loop the first belt over the left spindle and around
the lower groove of the center spindle pulley and the lower groove of the gearbox
drive pulley. The second belt connects the upper grooves of the center spindle
pulley and the gearbox drive pulley with the right spindle pulley.
9. Lower central plate.
10.Replace front nuts. Tighten front and rear nuts holding down central plate.
11.Turn the adjustment bolt clockwise until the proper belt tension is reached. This will
draw the gearbox support plate to the rear, thus tightening the belts.
12.Tighten the two blocking nuts on the adjustment bolt.
13.Retighten the four nuts holding the gearbox support to the central plate and replace
the belt shields.
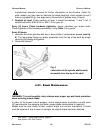
4.06 - Driveline
DANGER: Only use the original driveline supplied with this mower and always
with the safety shielding. Carefully read and file away the driveline operator’s
manual supplied by the manufacturer. The following does not substitute the
information found in the driveline manual.
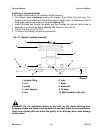
IMPORTANT: Always check driveline length during initial setup and when connecting to
a different tractor.
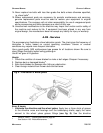
In the collapsed position the driveline should be approximately 2” from bottoming out to
prevent possible damage to the tractor or implement. When the driveline is in the
maximum extended position, the ideal minimum overlap of the two halves should be
approximately 6” (see fig. 14).
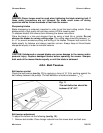
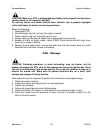
If determined that the driveline is too long, follow these procedures to adjust the length:
1. Separate the two driveline halves. Connect one half to the tractor PTO and the other
half to the mower.
2. Raise and lower the mower with the 3 point hitch to find the position where the
driveline is shortest. Hold the half shafts side by side and mark the desired length on
the outer female tube guard leaving a 1
1
/
2
” gap between the end of the guard tube
and bell guard.
MAINTENANCE 27 FRONTIER
G
ROOMING MOWERS OPERATOR’S MANUAL