


3
iOptron Corp. | 6E Gill Street | Woburn, MA 01801 USA | (781) 569-0200 | Toll Free (866) 399-4587 | www.iOptron.com
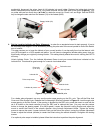
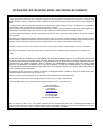
accidentally disconnect the wires. Insert 4 AA batteries into each holder. Replace the holder back into the
battery compartment and replace the lid. Plug hand controller into the HBX port on the mount (Figure 8). Turn
on power and use four Arrow keys (▲▼◄►) to rotate the mount Up, Down, Left, and Right. Use the SPEED
key to change the slew rate from the slowest (1X) to the fastest (MAX).
Figure 7
Figure 8
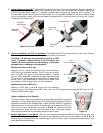
4. Set the Location Latitude and Polar Alignment:
In order for an equatorial mount to track properly, it has to
be accurately polar aligned. This is achieved by making the polar axis of the mount parallel to that of the Earth’s
axis of rotation.
This step requires you to know the latitude of your current location. It can be easily found on the Internet, with
your GPS navigator or a GPS capable cell phone. You will have to change this latitude setting every time you
significantly change your night sky viewing location. This setting directly affects the mount’s tracking and GOTO
accuracy.
Unlock Latitude Clutch. Turn the Latitude Adjustment Screw to set your current latitude as indicated on the
Latitude Dial. This should be good enough for a casual visual observation.
Figure 9. Align mount to the celestial pole
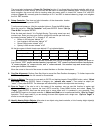
For a better polar alignment, one may use the polar scope opening on the R.A. axis. Take off the Polar Axis
Cover and Polar Scope Cover. Release the Counterweight Shaft as indicated in
Figure 10. Look through polar
scope opening to find the Polaris. If the opening is blocked by the DEC axis, power the mount on and use the
▲ or ▼ button on the hand controller to turn the DEC axle to unblock the view. (You may use the number
button to change the slewing speed. 9 for MAX speed). Loosen the Azimuth Locking Screws and adjust the
mount to center the Polaris in the azimuth direction using Azimuth Adjustment Knobs. Tighten the locking
screws to secure the mount. Loosen Latitude Clutch on the side of the mount, turning the Latitude Adjustment
Screw to adjust the latitude (altitude) to center the Polaris along the altitude direction. Re-tighten the locking
screws.
If an optional polar scope is installed, please follow the instruction to perform the polar alignment.
Batter
y
holder
(
X2
)
Azi. ad
j
. knob
Polar axis
(R.A. axis)
Polar axis cove
r
Latitude ad
j
. screw
Polar sco
p
e cove
r
Latitude clutch
Latitude dial