


8
ASSEMBLY
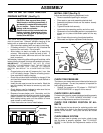
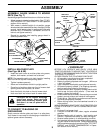
INSTALL BATTERY (See Figs. 4 & 5)
CAUTION: Do not short battery termi-
nals. Before installing battery, remove
metal bracelets, wristwatch bands,
rings, etc.
Positive terminal must be connected
first to prevent sparking from acci-
dental grounding.
• Lift hood to raised position.
• Be sure battery drain tube has not come loose and is
securely attached to drain in battery tray.
• Lower battery into battery tray with terminals to rear of
tractor.
• First connect RED battery cable to positive (+) battery
terminal with hex bolt, flat washer, lock washer and
hex nut as shown. Tighten securely.
• Connect BLACK grounding cable to negative (-) bat-
tery terminal with remaining hex bolt, flat washer, lock
washer and hex nut. Tighten securely.
• Slide the two battery bolts through the terminal guard
and start the wing nuts onto the threads.
• Position terminal guard over the battery as shown,
lower bolts into key holes and slide square shafts of
bolts into slots of key holes.
• Tighten wing nuts by hand making sure battery bolts
remain in slots of the key holes in the battery support.
• Be sure terminal access doors are closed.
Use terminal access doors for:
• Inspection for secure connections (to tighten hard-
ware).
• Inspection for corrosion.
• Testing battery.
• Jumping (if required).
• Periodic charging.
LOCK WASHER
POSITIVE
(RED)
CABLE
HEX NUT
FLAT
WASHER
NEGATIVE
(BLACK)
CABLE
HEX
BOLT
FIG. 4
FIG. 5
VENT CAPS
BATTERY
TRAY
BATTERY
DRAIN TUBE
TERMINAL GUARD ACCESS
DOORS
KEY HOLE
WING NUT
BATTERY
BOLT
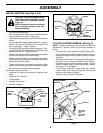
TO ATTACH FRONT BUMPER (See Fig. 6)
NOTE: For ease of assembly, you may wish to obtain the
assistance of another person for mounting bumper to
tractor.
• Press or tap the end caps into ends of bumper tube.
• Slide reinforcement plates inside flattened ends of
bumper and align holes in plates with slots in bumper
as shown.
• With plate and bumper holes aligned, set bumper on
ground in front of tractor and align the end holes in
bumper with the rear holes in tractor chassis. On both
sides of chassis loosely install carriage bolt, washer
and locknut. Do not tighten.
• Pivot bumper upwards to align holes with forward
chassis holes and install carriage bolt, washer and
locknut to both sides of chassis.
• Tighten all four (4) locknuts securely.
FIG. 6
CARRIAGE
BOLT
Install Rear
Hardware
First
Then Pivot
Upwards
REINFORCEMENT
BRACKET
WASHER
LOCKNUT
BUMPER
END CAP
CARRIAGE
BOLT