9
1.
Engine oil level: Check daily with engine cold
and on a flat surface. Remove the dipstick and
wipe clean. Reinsert the dipstick all the way,
but do not screw down. Remove the dipstick
and check oil level. If oil level is low add oil.
Use engine manufacturers specs for type of
oil.
2. Pump drive belt: Stop engine and remove key.
Check the tension on the belt.
3. Mower blades: Stop engine and remove key.
Inspect blades and sharpen or replace as
needed. Check daily or more often if needed.
The machine requires more power with dull
blades and gives a poor cut. If blades get bent,
replace them. Blades shouldn’t have any
notches from hitting objects. The air foil on
top of the blade should be sufficient to raise
the grass for cutting. If blades are in good con-
dition, sharpen at an angle of 22 to 28 degrees
about 2-1/2 inches in from the tips. Note: After
sharpening, check blades for proper balance,
if needed correct balance to prevent exces-
sive vibration.
4. Safety interlock system: Check daily and never
operate the mower if this system is not func-
tioning properly.
5.
Hardware: Stop engine and remove key thor-
oughly inspect the entire machine for any miss-
ing or loose hardware. Check daily.
6. Air cleaner: Stop engine and remove key. Re-
move plastic cover and loosen wingnut on the
air cleaner. Remove the foam pre-cleaner and
wash or replace if needed. Inspect paper filter
and replace if dirty. Check every 25 hours, daily
if in very dirty conditions. Fuel efficiency, en-
gine RPM, and available power goes down rap-
idly if the air filter is dirty. Prolonged effects
could damage the engine.
7. Engine oil: Change oil to manufacturers speci-
fications. Stop engine and remove key. Drain
oil when engine is warm. Thoroughly clean
around cap before removing. Remove oil
drain cap from the right side of engine block
and replace drain cap. Remove oil filter and
replace. Put a light coat
MAINTENANCE
of clean oil on the filter gasket before install-
ing. Fill engine with oil using manufacturers
specs, see Kawasaki owner’s manual. Start
engine and idle slowly to allow the oil to recoat
the interior of the engine and then inspect for
leaks.
8. Hydraulic oil: Check daily. Thoroughly clean
around cap. Remove cap. Oil level should be
1” below the bottom of the fill tube. If not, add oil.
NOTE: Use only synthetic 15W - 50 Mobil 1.
9. Tire pressure: Check every 25 to 50 hours.
Rear tires require 15 psi and caster tires 20
psi
10. Belts: Check every 25 hours. Stop engine and
remove key. Check the condition of all belts.
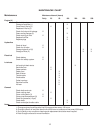
12. Lubrication (every 25 hours): Caster tires and
front caster pivots
(Clean grease zerk thoroughly before greas-
ing)
13. Fuel filter: Replace annually or as needed.
14. Hydraulic filter and oil: Change every 500 hours
or yearly. Stop engine and remove key. Clean
around the filter and the drain plug on the bot-
tom side of the tank. Remove the filter and al-
low any oil to drain from the filter head. Then
replace with new filter. Use only Husqvarna
p/n 102606, filter which has a bypass valve
and the correct micron filter. Remove one of
the hydraulic lines from the bottom of the tank
and allow the tank to drain, reinstall the hy-
draulic line. Fill tank with synthetic 15W - 50
Mobil 1. 1” below the fill tube and replace cap.
Block up the rear of unit until wheels will rotate
freely and start engine at a slow idle, move
the control levers forward and run for several
minutes. Stop engine and recheck oil level. If
wheels don’t response an air lock has occurred
within the hydraulic system. Bleed air from
lines, or let stand overnight to allow the air time
to dissipate out of the oil. Retry responses &
check the oil level. Note: Serious damage to
the pumps and wheel motors can occur if the
system is ran with an air lock.


