


13
OPERATION
BEFORE STARTING THE ENGINE
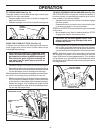
CHECK ENGINE OIL LEVEL (See Fig. 24)
The engine on your snow thrower has been shipped from
the factory already filled with oil.
1. Check engine oil with snow thrower on level ground.
2. Remove oil fill cap/dipstick and wipe clean, reinsert
the dipstick and screw tight, wait for a few seconds,
remove and read oil level. If necessary, add oil until
“FULL” mark on dipstick is reached. Do not overfill.
• To change engine oil, see “TO CHANGE ENGINE OIL”
in the Main te nance sec tion of this manual.
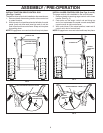
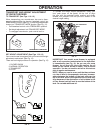
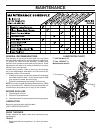
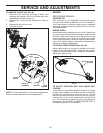
TO ADJUST SKID PLATES (See Fig. 22)
NOTE: The wrench provided in your parts bag may be
used to adjust the skid plates.
Skid plates are located on each side of the auger housing
and adjust the clearance between the scraper bar and the
ground surface. Adjust skid plates evenly to proper height
for current surface conditions. For removal of snow in
normal con di tions, such as a paved driveway or side walk,
place skid plates in the highest position (lowest scraper
clear ance) to give a 1/8" clearance between the scraper
bar and the ground. Use a middle position if the surface
to be cleared is uneven.
NOTE: It is not recommended to operate the snow thrower
over gravel or rocky surfaces. Objects such as gravel, rocks
or other debris, can easily be picked up and thrown by the
impeller, which can cause serious personal injury, property
dam age or damage to the snow thrower.
• If snow thrower must be operated over gravel surface,
use extra caution and be sure skid plates are adjusted
to lowest (highest scraper clear ance) position.
1. Shut off engine and wait for all moving parts to stop.
2. Adjust skid plates by loosening the hex nuts, then mov-
ing skid plate to desired position. Be sure both plates
are adjusted evenly. Tighten securely.
SKID PLATE
LOW POSITION
(HIGH GROUND
CLEAR ANCE)
HEX
NUTS
HIGH POSITION
(LOW GROUND
CLEARANCE)
AUGER
HOUSING
FIG. 22
SCRAPER
BAR
SCRAPER BAR (See Fig. 22)
After considerable use the scraper bar may become worn.
Replace a damaged or worn scraper bar.
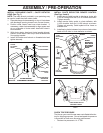
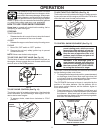
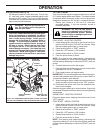
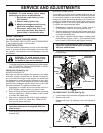
TO USE DRIFT CUTTERS (See Fig. 23)
Use the drift cutters to cut through deep snowdrifts that
are higher than the front of the snow thrower.
• Loosen adjustment nuts enough to allow drift cutter to
be raised to highest position and tighten nuts securely.
Repeat for opposite side of snow thrower.
• When not using drift cutters, loosen adjustment nuts,
lower to storage position and tighten nuts securely.
ADJUST-
MENT NUTS
STORAGE
POSITION
AUGER
HOUSING
DRIFT
CUTTER
FIG. 23
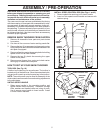
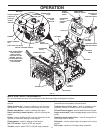
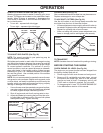
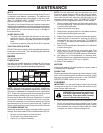
POWER STEERING OPERATION (See Fig. 21)
Steering triggers are used to assist in steering your snow
thrower. The triggers are located on the underside of each
handle. When a trigger is squeezed, it disengages the
drive wheel on that side of snow thrower and allows it to
turn in that direction.
• To turn left – squeeze left side trigger.
• To turn right – squeeze right side trigger.
LH TURN
TRIGGER
RH TURN
TRIGGER
FIG. 21
TO TRANSPORT
NOTE: Use steer levers to freewheel for pushing or towing.