


6
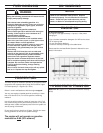
EXCEL SERIES BLADES
The Excel Series of diamond blades have been designed specically for the Soff-Cut Ultra Early Entry dry cutting system of
green concrete. These specialty blades are designed to increase speed and life while cutting a wide range of aggregates.
Choose the correct specication of diamond blade for your area as follows:
Purple Excel Series 1000 XL10-1000 Ultra hard aggregate and non abrasive sand
Green Excel Series 2000 XL10-2000 Hard to ultra hard aggregate and non abrasive sand
Red Excel Series 3000 XL10-3000 Hard aggregate, medium abrasive sand
Orange Excel Series 4000 XL10-4000 Medium hard aggregate, medium abrasive sand
Yellow Excel Series 5000 XL10-5000 Medium hard to soft aggregate, abrasive sand
Black Excel Series 6000 XL10-6000 Soft aggregate, highly abrasive sand
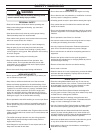
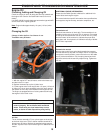
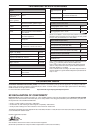
Step 1
With the saw turned off and using both hands, push down on
the handle bar and raise the saw to its full height and locked
position.
Step 2
Remove the blade block cover (A) by turning the two locking
knobs counter-clockwise. Insert the blade wrench supplied
with the saw on the blade shaft bolt (B) on the end of the blade
shaft in the blade block (C). Rotate the blade shaft counter-
clockwise with the wrench on the blade shaft bolt (B) while
pushing in on the blade shaft locking pin (D) located on the
top of the saw frame in front of the engine. The locking pin will
drop down in the blade shaft and prevent the shaft from rotat-
ing.
Step 3
Remove the blade shaft bolt by continuing to turn the bolt
counter-clockwise. Remove the outer arbor washer or ange
(E).
WARNING
Inspect the blade (K) for any damage. Do not use any
blade that has cracks, nicks, aws or a damaged arbor.
Make sure the blade is marked with a maximum operat-
ing speed greater than 3200 rpm.
Step 4
Match the blade tri-arbor to the blade shaft arbor (F) and install
the blade rmly against the rear ange (F). Insure the blade is
installed on the tri-arbor correctly. Match the female tri-arbor of
the outer washer or ange with the blade shaft and install the
blade shaft bolt turning clockwise while holding the locking pin
down. Be sure the outer ange is fully seated and rmly hold-
ing the diamond blade in position.
Step 5
Install a new skid plate (G) by hooking the front on the front
blade block shaft pin. Connect the rear blade block shaft and
the rear of the skid plate by installing the locking pin (H).
Step 6
Install the blade cover by turning the two knobs and tighten un-
til fully seated against the blade block. Lift the front and rear of
the skid plate to insure the blade slides through the skid plate
freely.
Step 7
Insure the lexan shields (I & J) move freely up and down.
When replacing a worn blade, thoroughly clean the concrete
from blade block and blade cover before installing the new
blade. Discard the old skid plate and replace it with a new skid
plate.
NOTE:
The patented skid plate is the most important part of the
Soff-Cut Ultra Early Entry system. If it is bent, twisted or
damaged, spalling and raveling of a cut may result. Store
skid plates carefully and install them properly. Install a
new skid plate with each new blade. Never re-use skid
plates.
A
C
D
B
F
G
E
H
BLADE AND SKID PLATE INSTALLATION
I
J
K