


14 15
1312
If there is no signals received from the remote sensor for
more than 2 minutes, a dashes “ ” will be displayed.
Press and hold button for 2 seconds to activate an
immediate signal search.
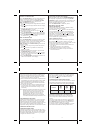
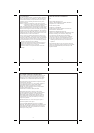
TEMPERATURE TREND INDICATORS
The trend indicators shows the trend of indoor or outdoor
temperatures collected at a particular remote sight. There
are three trends will be shown: Rising, Steady, and Falling.
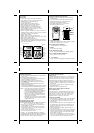
If this does not work, please perform the following steps:
1. Bring the main unit and remote sensor close together.
2. Remove 4 a small screws from the back of the remote
sensor and open the battery compartment.
3. Remove the batteries from the battery compartment and
reinstall them in the same manner. Remote sensor LED
indicator will flash showing transmission of the signal.
4. Remove the batteries from the main unit and reinstall
them in the same manner.
5. On the main unit select the same channel number that
set on the remote sensor. Outdoor temperature on the
display will show that transmission is being received
successfully.
Note: When the temperature falls below the freezing point
the batteries in the remote sensor(s) will freeze
lowering their voltage output and effective range.
During prolonged periods of extreme cold it is
advisable to bring the remote sensor indoors, if
alkaline batteries are being used. We recommend
to use lithium ion batteries at temperatures below 32˚F.
TRANSMISSION COLLISION
Signals from other household devices, such as door bells,
home security systems and entry controls, may interfere
with this product and cause temporary reception failure.
This is normal and does not affect the general performance
of the product. The transmission and reception of the
temperature readings will resume once the interference ends.
CHECKING REMOTE AND
INDOOR TEMPERATURE
The indoor temperature is shown on the third line of the
main unit display. The remote temperature is shown below
the top line of the display. The wave icon near the remote
temperature reading indicates that there is a good signal
reception from the remote sensor.
MAXIMUM AND MINIMUM TEMPERATURE
The maximum and minimum records of the indoor and
remote temperature will be automatically stored in the
memory.
The main unit will display the minimum, maximum and
the current reading upon each press of the MEM button.
If the MEM button is not pressed, the unit will return to
the current temperature display in 15 seconds.
To clear the memory, press and hold MEM for 3 seconds.
The maximum and minimum readings will be erased.
SINGLE ALARM SETTING
Press ALARM ON/OFF to select the single alarm. If the
alarm is disarmed, the alarm time will be displayed as
“OFF”. If you choose not to set the SINGLE ALARM
press ALARM ON/OFF again to advance to the
PRE-ALARM setting procedure.
1. Press to view the previous single alarm time and arm
the alarm.
2. Press to disarm the single alarm and have the display
read “OFF”.
3. When the single alarm time is visible, press and hold
ALARM ON/OFF for 3 seconds;
4. The alarm hour digit will flash, then press or to
adjust the desired hour.
5. Press ALARM ON/OFF again, the alarm minute digit
will flash, then press or to adjust the desired minute.
6. Press ALARM ON/OFF again and the single alarm is
set with the icon “ ” on the display.
PRE-ALARM SETTING
Press ALARM ON/OFF to select the pre-alarm. If alarm
is disarmed, the alarm time will be displayed as “OFF”.
The pre-alarm can be set only if the weekday alarm or the
single alarm is set. If you choose not to set the
PRE-ALARM press ALARM ON/OFF again to exit the
setting procedure.
1. Press to view the previous pre-alarm time and arm
the alarm.
2. Press to disarm the pre-alarm time and have the
display read “OFF”.
3. When the pre-alarm time is displayed, press and hold
ALARM ON/OFF for 3 seconds;
4. The minute digit will flash, then press or to adjust
the desired pre-alarm period in the sequence of 15, 30,
45, 60, 75, 90 minutes.
5. Press ALARM ON/OFF again and the pre-alarm is set
with the icon “PRE-AL” on the display.
USING THE ALARM AND SNOOZE
When the alarm sounds, press the LIGHT/SNOOZE key
to temporarily stop the alarm. After depressing LIGHT/
SNOOZE, the alarm sound will resume in 5 minutes. If the
alarm is not disabled after that, it will sound for 4 more
minutes and then will stop by itself.
Press ALARM ON/OFF to disable any alarm.
DISABLING ATOMIC TIME
SIGNAL RECEPTION
The main unit can be set manually to disable the daily
reception of the WWVB time signal.
Press and hold the and buttons at the same time for
3 seconds and the radio reception icon will disappear.
To enable the main unit’s ability to receive the WWVB
time signal, press and hold the and buttons at the
same time for 3 seconds again. The radio reception icon
will turn on and flash. The main unit will start to search
for the WWVB time signal immediately.
LOST COMMUNICATION
If the main unit display for the remote sensor goes blank,
press and hold for 3 seconds to begin a new signal
search. If the signal still isn't received, please make sure that:
1.The remote sensor is in its proper location.
2.The distance between the main and remote units is not
over 100 feet.
3.The path between units is clear of obstacles.
Shorten the distance between units if necessary.
4.Fresh batteries are installed correctly in both remote
sensor and main unit.
S
Arrow
Indicator
Temperature
Steady FallingRising