


6 7
54
BEFORE YOU BEGIN
1. We recommend using alkaline batteries for main unit and
remote sensor.
2. Avoid using rechargeable batteries.
3. Insert batteries before first use, matching the polarity as
shown in the battery compartment.
4. Always insert batteries in the remote sensor first.
5. Press RESET after each battery change, using a paper
clip or similar tool.
6. During an initial setup, place the main unit as close as
possible to the remote sensor.
7. After reception is established, position the remote sensor and
main unit within the effective transmission range of 100 feet.
NOTE:1. Avoid setting the time and date on the main unit
before the remote temperature is displayed.
2. The effective operating range may be influenced
by the surrounding building materials and how
the receiver and transmitter are positioned.
3. Place the remote sensor so that is faces the main
unit (receiver), minimizing obstructions such as
doors, walls, and furniture
4. Though the remote sensors are weather- resistant,
they should be placed outdoors away from direct
sunlight, rain or snow.
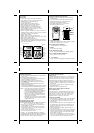
BATTERY INSTALLATION
TEMPERATURE SENSOR
NOTE: Install the batteries; select the channel and temperature
unit (˚C or ˚F) before you mount the sensor
1. Remove the screws in the battery compartment with
a small Phillips screwdriver.
2. Set the channel. The switch is located in the battery
compartment. Channel 1 is typically selected if only 1
remote sensor is being used.
3. If you are using more than one sensor, select a
different channel for each sensor.
4. Install 2 “AA” size alkaline batteries (not included)
matching to the polarities shown in the battery compartment.
5. Replace the battery compartment door and secure the screws.
6. Secure the remote sensor in the desired location.
REMOTE TEMPERATURE SENSOR
* Remote temperature transmission to the main unit via
433MHz signal
* Case can be mounted on the wall using built-in hanger
* 100 feet transmission range without interference
* LCD display of measured temperature
* Temperature display unit (˚C or ˚F) selection
* Transmission channel selection
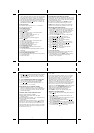
BATTERY INSTALLATION
MAIN UNIT
The Wireless Weather Forecaster uses 2 “AA” batteries (not
included). When the LCD becomes dim or the respective
low battery indicator shows up on the indoor or remote
temperature display, the battery replacement is required.
To install or replace the batteries, please follow these steps:
1.Remove the battery compartment door on the back of
the main unit.
2.Insert 2 “AA” size batteries (not included) matching
the polarities shown.
3.Replace the battery compartment door.
HOW TO USE THE TABLE STAND OR
WALL MOUNTING
The main unit has a removable table stand, that supports
it on a flat surface. The unit can also be mounted on the
wall using the recessed screw hole. The stand must be
removed prior to mounting. The remote sensor can be
similarly mounted or placed on a flat surface.
GETTING STARTED
1.After the batteries are installed, remote sensor will transmit
the temperature readings at adout 45 second intervals.
2. The main unit may take up 2 minutes to receive the
initial readings.
3.Upon successful reception, the remote temperature will
be displayed under the top line of the main unit LCD
display, and the indoor temperature will be displayed
below the remote one.
4.The main unit will automatically update readings at
45-second intervals.
5.After the main unit finishes searching for the temperature
signal from the remote unit(s), the WWVB time signal
receiver will start searching for the atomic time signal.
It takes about 5-8 minutes.
If in 8 minutes the WWVB time signal has not been
received, use the MODE button to set the time manually
(see "setting the time and date manually" section.)
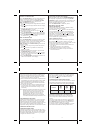
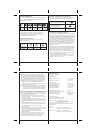
Barometric Pressure Trend
Outdoor
Temperature
Trend
Outdoor
Temperature
Display
Indoor
Temperature
Trend
Indoor
Temperature
Display
Time
Weekday Alarm Time
Battery Low
Indicator
Pre-Alarm
Indicator
Weekday
Display
Radio
Reception Icon
Time Zone
Display
Channel
Number
Remote
Reception Icon
Weather
Forecast
Single Alarm
Indicator
Month Display
Date Display
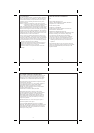
A LED INDICATOR
Flashes once when the remote sensor transmits a reading
Flashes twice when battery power is low
B BATTERY COMPARTMENT
Accommodates two AA-size batteries
CRESET
Resets all previous settings
DCHANNEL SELECTOR
Selects the desired channel before installing batteries
E WALL-MOUNT RECESSED HOLE
Keeps remote sensor on the wall.
F ˚C/˚F SWITCH
Selects the temperature display in Fahrenheit or Celsius
THERMO – SENSOR
433MHz WIRELESS
1
2
3
A
FEATURES
MAIN UNIT
* Precise time keeping with daily clock updates
* Time display shows hours, minutes and seconds
* Calendar display with month and date
* US time zone settings
(Pacific, Mountain, Central & Eastern)
* Radio-controlled signal reception indicator
* User-selectable 12/24 hour time format
* Weekday displayed in 5 different languages-
English, Spanish, French, German or Italian
* User-Selectable temperature display in ˚C or ˚F
* Indoor temperature display
* Remote temperature monitored from up to 3 locations via
433MHz frequency band (one remote sensor is included)
* 3 barometric pressure trend indicators:
Rising, Steady, Falling
* Weather forecast in 5 large graphic icons:
Sunny, Cloudy, Partly Cloudy, Light Rain, Heavy Rain
* Wall mount or desktop option
* Dual crescendo alarm with snooze
* Programmable low-temperature pre-alarm warns about icy
or inclement weather conditions prior to regular alarm time
* LCD with blue backlight
M
D
MIN
MAX
PM
AM
PM
AM
CH
IN
PRE-AL
s
w
Z
Z
M
D
MIN
MAX
PM
AM
PM
AM
CH
IN
PRE-AL
s
w
Z
Z
C
B
D
E
F
RESET
˚C/˚F
CHANNEL
123