


1413
1615
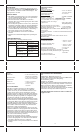
COMFORT LEVEL INDICATORS
This product is capable of detecting and displaying the
current indoor comfort levels of surrounding environment.
The comfort level is displayed on the weather station
portion of the main unit’s display. It is based on the
combination of the current indoor temperature and
humidity readings. There are following comfort levels
may be displayed: COMFORT (comfortable); WET (wet)
and DRY (dry)
Indicator
displayed
Temperature
Range
Humidity
Range
Shows current
condition
COMFORT
WET
DRY
40%RH-
70%RH
OVER
70%RH
Below
40%RH
Ideal for
both relative
humidity and
temperature
Contains excess
moisture
Contains
inadequate
moisture
20˚C to 25˚C
(68˚F to 77˚F)
-5˚C to 50˚C
(23˚F to 122˚F)
-5˚C to 50˚C
(23˚F to 122˚F)
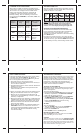
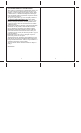
Forecast
is...
Sunny
Partly
Cloudy
Cloudy Rainy
When the
display
shows...
Snowy
NOTE: The weather forecast accuracy is approximately
70%.The main unit display shows forecasted, not
current conditions. The SUNNY icon indicates clear
weather, even when displayed during the night-time.
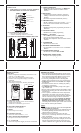
MAXIMUM AND MINIMUM READINGS
The maximum and minimum record of the indoor and
remote temperature and humidity will be automatically
stored in the memory of the main unit (receiver).
To display the minimum, maximum or the current reading
press MEM button.
If no button is pressed for the next 15 seconds, the unit
will return to the current temperature and humidity display.
To clear the memory, press and hold MEM button for two
seconds and all previously stored readings will be erased.
WEATHER FORECAST
This unit is capable of detecting the atmospheric pressure
changes. Based on collected weather data, it forecasts the
weather for the next 12 to 24 hours.
LOST COMMUNICATION
If the main unit display line for the remote sensor reading
goes blank, press and hold DOWN ( ) button for
2 seconds to begin a new signal search. If the signal still
isn’t received, please make sure that:
• The remote sensor is in its proper location.
• The distance between main unit and remote sensor(s) is
not over 200 feet (60meters).
• The path between units is clear of obstacles. Shorten the
distance if necessary.
• Fresh batteries are installed correctly in both remote
sensor and main unit.
If there is no reception, please perform the following steps:
• Bring the main unit and remote sensor close together.
• Remove four (4) small screws from the back of the
remote sensor with small Phillips screwdriver, and open
the battery compartment.
• Remove the batteries from the battery compartment and
reinstall them in the same manner. Remote sensor LED
indicator will flash showing transmission of the signal.
• Remove the batteries from the main unit and reinstall
them in the same manner.
• On the main unit select the same channel number using
CHANNEL button as set on the remote sensor. The
remote temperature and humidity appeared on the main
unit’s display will show that transmission is being
received successfully.
TRANSMISSION COLLISION
Signals from the other household devices such as wireless
doorbells, home security systems, and entry control, may
interfere with this product or cause temporary reception
interruption. This is normal and will not affect the general
performance of the product. The transmission and
reception of the temperature and humidity readings will
resume once the interference subsides.
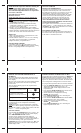
ANALOG CLOCK DISPLAY
Immediately after the battery installation, the clock’s hour
and minutes “hands” will start moving and stop at 4:00,
8:00 or 12:00 position.
To program the desired time,
• Press and hold the CLOCK SET button, located inside
the battery compartment – the MINUTE and HOUR
hands will start moving clockwise
• Release the CLOCK SET button, once the MINUTE
and HOUR hands have reached the desired time
position. Immediately after releasing the CLOCK SET
button, the SECONDS hand will start moving,
confirming that clock is started.
ALARM
To set the time alarm,
• Turn the ALARM knob, moving the ALARM hand
(smallest from three) to the desired alarm time
• Release the ALARM knob
• Slide ON/OFF switch to the ON position
DISABLING THE ALARM
Slide the ON/OFF switch on the main unit to the OFF
position disabling the clock’s alarm.
SNOOZE
When the time alarm sounds, press the SNOOZE/LIGHT
button to temporarily stop it. After the SNOOZE/LIGHT is
depressed, the time alarm sound will resume in four minutes.
If the alarm is not disabled after that, it will sound for two
more minutes and then will stop by itself.