


Page 11 — English
OPERATION
NOTE: If the engine is warm, leave the choke lever in the
ON (COLD START) position. Allow the engine to run for 5
seconds, and then push the choke to the RUN position.
Put the engine switch in the ON position.
Pull the recoil starter grip until the engine runs (a maximum
of 6 times).
NOTE: Do not allow the grip to snap back after starting;
return it gently to its original place.
CAUTION:
If the engine does not start after each pull of the starter
grip and rope, squeeze the trigger to relieve water pres-
sure before attempting to start the engine again.
Allow the engine to run for 5 seconds, then push the
choke lever to the RUN position.
To stop the engine:
Put the engine switch in the OFF position.
Pull trigger to release water pressure.
USING THE SPRAY WAND TRIGGER
See Figure 15.
For greater control and safety, keep both hands on the
trigger handle at all times.
Pull back and hold the trigger to operate the pressure
washer.
Release the trigger to stop the flow of water through the
nozzle.
To engage the lock out:
Push up on the lock out until it clicks into the slot.
To disengage the lock out:
Push the lock out down and into its original position.
For the most effective cleaning, the spray nozzle should be
between 8 in. and 24 in. from the surface to be cleaned. If
the spray is too close it can damage the cleaning surface.
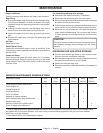
SELECTING THE RIGHT NOZZLE FOR THE JOB
See Figures 16.
Each of the nozzles has a different spray pattern. Before
starting any cleaning job, determine the best nozzle for the
job. The following chart offers some general guidelines to
help you choose the best nozzle for your application.
Nozzle Application
0º Red Spot cleaning of high, hard-to-reach areas
• Removingcaked-onmudfromheavycon-
struction, farm, or lawn equipment
• Cleaningtar,glue,orstubbornstainsfrom
concrete
• Cleaningoverheadareas
• Removing rust from steel and oxidation
from aluminum
Nozzle Application
25º Green For general purpose or large surfaces
• Generalcleaningofdirt,mud,andgrime
• Cleaningroofs,gutters,anddownspouts
• Removinglightmildewstains
• Removingalgaeandbacteriabuild-upfrom
pools
• Rinsing surfaces in preparation for
painting
40º White For wide-angle rinsing
• Lightcleaningandwashing
• Washingandrinsingofpaintedsurfaces
and boats
• Cleaning roofs, windows, patios, and
driveways
Soap
(Black)
For all detergent applications
WARNING:
NEVER change nozzles without locking the lock out on
the trigger handle and NEVER point the wand at your
face or at others. The quick-connect feature contains
small springs that could eject the nozzle with some force.
Failure to heed this may cause personal injury.
Using the quick-connect collar, changing nozzles is easy.
To connect a nozzle to the trigger handle:
Turn off the pressure washer and shut off the water
supply. Pull trigger to release water pressure.
Engage the lock out on the trigger handle by pushing up
on the lock out until it clicks into the slot.
Pull back the quick-connect collar.
Push the nozzle into place in the spray wand.
Push the collar forward so that the nozzle is secured
properly. Check to see that the nozzle is secure.
To disconnect a nozzle from the trigger handle once the
cleaning job is complete:
Turn off the pressure washer and shut off the water
supply. Pull trigger to release water pressure.
Engage the lock out on the trigger handle by pushing up
on the lock out until it clicks into the slot.
Remove the nozzle by placing hand over nozzle then
pulling back the quick-connect collar. Place nozzle in the
nozzle storage area on the top of the spray wand.
WASHING WITH DETERGENT
See Figure 17.
Use only detergents designed for pressure washers; house-
hold detergents, acids, alkalines, bleaches, solvents, flam-
mable material, or industrial grade solutions can damage
the pump. Many detergents may require mixing prior to use.