Page 6 — English
ASSEMBLY
WARNING:
To prevent accidental starting that could cause serious
personal injury, always disconnect the engine spark plug
wire from the spark plug when assembling parts.
FRONT HANDLE
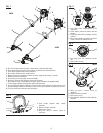
See Figure 2.
NOTE: On units with curved shafts, for shipping purposes
only, the handle is located underneath the drive shaft housing.
The handle must be rotated before operating the trimmer.
Slightly loosen the wing nut on the handle.
Rotate the handle on the drive shaft housing at the loca-
tion indicated by the label on the shaft.
Retighten the wing nut to secure the handle in place.
STRING HEAD ASSEMBLY
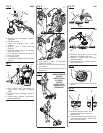
See Figures 3 - 4.
Place the string head assembly on the end of the drive
shaft housing. Make sure the hex-shaped opening on
the string head assembly seats completely on the drive
shaft. Install the spool retainer to secure.
Install the spool retainer:
Turn the spool retainer clockwise for 26CS.
Turn the spool retainer counterclockwise for 26SS.
Remove the plastic seal from the string head assembly.
Slide strings into the housing eyelets and pull outward
to rotate the spool into the cutting position.
Push the spool retainer down while pulling on string(s)
to manually advance the string and to check for proper
assembly of the string head.
WARNING:
Do not allow familiarity with this product to make you
careless. Remember that a careless fraction of a second is
sufficient to inflict serious injury.
WARNING:
Always wear eye protection with side shields marked to
comply with ANSI Z87.1, along with hearing protection.
Failure to do so could result in objects being thrown into
your eyes and other possible serious injuries.
CURVED SHAFT GRASS DEFLECTOR – 26CS
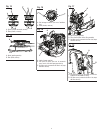
See Figure 5.
WARNING:
The line cutting blade on the grass deflector is sharp.
Avoid contact with the blade. Failure to avoid contact
can result in serious personal injury.
Remove the bolt, washer, and wing nut from grass
deflector.
Press the grass deflector onto the bottom of the curved
shaft as shown.
Insert the bolt through the grass deflector and the bracket
on the curved shaft.
Place the washer on the bolt.
Place the wing nut on the bolt and tighten securely.
STRAIGHT SHAFT GRASS DEFLECTOR –
26SS
See Figure 6.
Remove the wing nut and mounting bracket from the grass
deflector.
Assemble straight shaft grass deflector to drive shaft so
that the pin in the grass deflector fits in the locator hole
in the lower side of the drive shaft near the gear head.
Place the mounting bracket over the drive shaft so the
square tab on the mounting bracket fits into the slot in
the straight shaft grass deflector.
Rotate the mounting bracket so the screw on the grass
deflector goes into the slot on the mounting bracket.
Reinstall the wing nut and tighten securely.
OPERATION
WARNING:
Never use blades, flailing devices, wire, or rope on this prod-
uct. Do not use any attachments or accessories not rec-
ommended by the manufacturer of this product. The use of
attachments or accessories not recommended can result
in serious personal injury.
Before each use, inspect the entire product for damaged,
missing, or loose parts such as screws, nuts, bolts, caps, etc.
Tighten securely all fasteners and caps and do not operate
this product until all missing or damaged parts are replaced.
Please call 1-800-242-4672 or contact an authorized service
center for assistance.


