


10
OPERATION
Fig. 6
Fig. 7
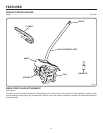
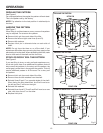
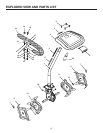
REGULAR TINE PATTERN
See Figure 6.
For most applications, the regular tine pattern will work best.
This is the pattern set by the factory.
NOTE: Pay attention to the hub position in relationship to
the tines.
NARROW TINE PATTERN
See Figure 7.
When tilling in confined areas or rows, a narrow tine pattern
may be required. For a narrow tine pattern:
Remove hitch pin from each side of the tiller.
Remove the left and right outer tines (A and D).
Remove felt washers.
Replace hitch pin in alternate holes on each side of
shaft.
NOTE: Do not force the tines on or off the shaft. If you
experience difficulties when removing the tines, apply some
penetrating oil on the shaft. When reinstalling the tines, make
sure to clean and oil the shaft and the tine hubs.
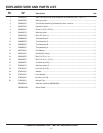
STONY OR ROCKY SOIL TINE PATTERN
See Figure 8.
If you are tilling in stony or rocky soil and experience con-
tinual rock jams, there is an additional tine pattern that will
help correct the problem. In the stony soil tine pattern, the
center gap is wider than in the regular tine pattern. This will
require additional passes to till the area. For a stony soil
tine pattern:
Remove hitch pin from each side of the tiller.
Remove tines and felt washers from the shaft.
Reinstall tines B and C on opposite sides of the shaft.
When facing the tiller attachment, tine B will now be on
the left and tine C will be on the right.
Reinstall felt washers.
Reinstall tines A and D. Tines D and B will now be on one
side, with tines A and C on the other.
Replace hitch pins.
D
B
C
A
TINE HUB
HITCH PIN
REGULAR TINE PATTERN
NARROW TINE PATTERN
B
C
HITCH PIN
D
B C
A
HITCH PIN
STONY OR ROCKY SOIL TINE PATTERN
Fig. 8
FELT WASHER
FRONT VIEW
FRONT VIEW
FRONT VIEW