


7
○ Fuel contains highly fl ammable and it is possible to get the
serious personal injury when inhaling or spilling on your body.
Always pay attention when handling fuel. Always have good
ventilation when handling fuel inside building.
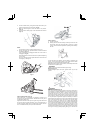
Fig. 7
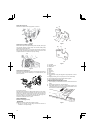
Fuel
○ Always use branded 89 octane unleaded gasoline.
○ Use genuine two-cycle oil or use a mix between 25:1 to 50:1,
please consult the oil bottle for the ratio or HITACHI dealer.
○ If genuine oil is not available, use an anti-oxidant added quality
oil expressly labeled for air-cooled 2-cycle
engine use (JASO
FC GRADE OIL or ISO EGC GRADE). Do not use BIA or TCW
(2-stroke water-cooling type) mixed oil.
○ Never use multi-grade oil (10 W/30) or waste oil.
○ Always mix fuel and oil in a separate clean container.
Always start by fi lling half the amount of gasoline,
which is to be
used.
Then add the whole amount of oil. Mix (shake) the fuel mixture. Add
the remaining amount of gasoline.
Mix (shake) the fuel-mix thoroughly before fi lling the fuel tank.
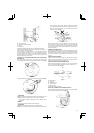
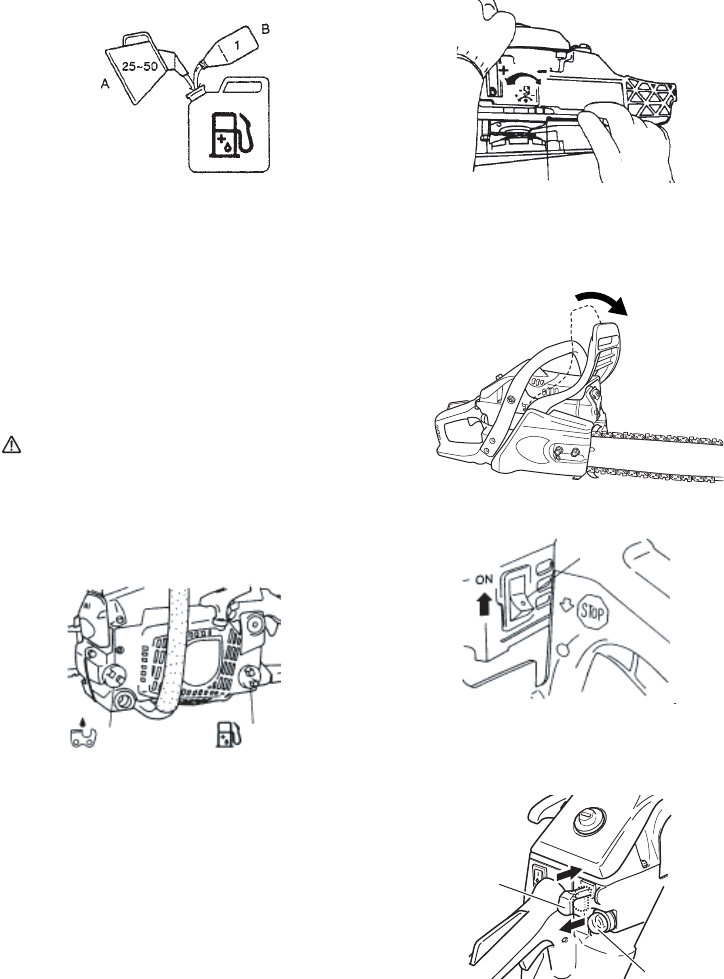
Fueling
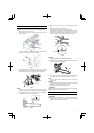
WARNING (Fig. 8)
○ Always shut off the engine before refueling.
○ Slowly open the fuel tank (12), when fi lling up with fuel, so that
possible overpressure disappears.
○ Tighten the fuel cap carefully, after fueling.
○ Always move the unit at least 3 m from the fueling area before
starting.
○ Always
wash any spilled fuel from clothing immediately with
soap.
○ Be sure to check any fuel leaking after refueling.
13
12
Fig. 8
Before fueling, clean the tank cap area carefully, to ensure that no
dirt falls into the tank. Make sure that the fuel is well mixed by shaking
the container, before fueling.
Chain oil (Fig. 8)
Fill up with chain oil (13). Always use good quality chain oil. When the
engine
is running, the chain oil is automatically discharged.
NOTE
When pouring fuel (12) or chain oil (13) into the tank, place the
unit with cap side up. (Fig. 8)
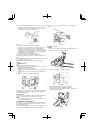
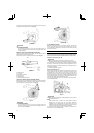
ADJUSTMENT OF CHAIN OIL SUPPLY
The chain oil quantity discharged through the lubrication system is
factory adjusted to the maximum. Adjust the quantity
in accordance
with the operating condition.
Tur n the adjusting screw (14) counter-clockwise to increase the
quantity and turn it clockwise to decrease the quantity. (Fig. 9)
(standard setting turns counter-clockwise 1-1 1/2 from slightly
seated)
14
Fig. 9
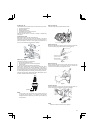
Starting (Fig. 10
-
15)
CAUTION
Before starting, make sure chain brake is engaged and that the
bar/chain does not touch anything. (Fig. 10)
Fig. 10
1. Set ignition switch (15) to ON position. (Fig. 11)
15
Fig. 11
2. Pull the choke lever (16) to choked position. (Fig. 12)
This will automatically lock the throttle in starting position.
*Push priming bulb (17) several times so that fuel fl ows through
bulb into carburetor. (Fig. 12)
17
16
Fig. 12