


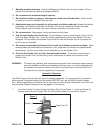

2. Slide the Handle (1) down into the Body (4)-see Figure 2.
Handle (1)
Body (4)
Figure 2
3. Slide the Axle (6) through each of the eyelets located at each side on the bottom of the
Body (4). Slide one Sleeve (5) onto each end of the Axle (6)-see Figure 2.
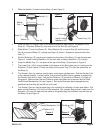
4. Slide Wheel (7) over the Sleeve (5). Place Washer (8) on end of Axle (6) and thread on
Nut (9) to secure Wheel (7) in place-see Figure 3 (insert). Repeat for second side of the
Axle (7).
5. Set the Stretcher (15) over the pins located on the sides of the Body (4) near its base-see
Figure 3. Install Locking Washers (10) on each side to secure Stretcher (15) in place.
6. Snap the Middle Tray (11) into place at the top of the Body (4) as shown in Figure 2.
7. The Lower Tray (12) is to be installed at the bottom of the Body with part of it resting on the
Platform (13)-see Figure 3. Place the hooks of the Lower Tray (12) over the bottom bar on
the Body (4).
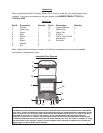
8. The Garden Cart can now be used to carry and tranport garden tools. Roll the Garden Cart
to the desired location. Locate a solid, firm and level location that is capable of supporting
the Garden Cart and it’s load. Fold out the Platform (13) so that the Platform (13) rests on
the ground. Make certain that the Platform snaps into place and is secured by the Quick
Lock/Unlock Mechanism (14)-see Figure 4. Be careful that tools being transported are
positioned so that they will not fall out of the cart.
9. The Garden Cart can hold a plastic bag (not included) for collection of trash and debris. Pull
down on the Stretcher (15) until it is fully extended. Set a plastic Bag so that it rests over the
Stretcher (15), and roll and tuck the inside of the plastic bag (not included) into the slots on
the Body (4)-see Figure 5.
Axle (6)
Sleeve (5)
Wheel (7)
Middle
Tray (11)
Stretcher (15)
Pins
Install Locking
Washers (10)
Figure 3
Lower Tray (12)
Platform (13)
Lock/
Unlock Mechanism (14)
Stretcher (15)
Bag not included
Nut (9)
Figure 4 Figure 5
SKU 91121 Page 4