


9. Maintain products with care. Keep the Multipurpose Garden Cart in a dry location. Do not
expose it to prolonged sunlight or prolonged moisture.
10. Do not exceed the maximum weight capacity.
11. Do not allow children to play on, stand upon or climb on the Garden Cart. Adults should
not lean on or use the Garden Cart as a seat.
12. Keep plastic bags (not included) out of the reach of children and pets. Beware that plastic
trash bags (not included) used with the Garden Cart can be a hazard to children and pets.
Plastic bags if used incorrectly can cause choking, suffocation and other injury.
13. Do not overreach. Keep proper footing and balance at all times.
14. Use the right Garden Cart for the job. Do not attempt to force a small Garden Cart to do the
work of a larger Garden Cart. There are certain applications for which this Garden Cart was
designed. Do not modify this Garden Cart and do not use this Garden Cart for a purpose for
which it was not intended.
15. Do not use or assemble the Garden Cart if under the influence of alcohol or drugs. Read
warning labels on prescriptions to determine if your judgement or reflexes are impaired while
taking drugs. If there is any doubt, do not assemble or use the Garden Cart.
16. Only use the Garden Cart on a flat, level and solid surface. The surface must be able to
support the Garden Cart, as well as any tools, accessories or debris that is stored on the
Garden Cart.
WARNING: The warnings, cautions, and instructions discussed in this instruction manual cannot
cover all possible conditions and situations that may occur. It must be understood by
the operator that common sense and caution are factors which cannot be built into
this product, but must be supplied by the operator.
Assembly/ Operation
Your Multi-Purpose Garden Cart will require complete assembly. It is important that you read the
entire manual to become familiar with the product BEFORE you use the Multi-Purpose Garden
Cart. Before assembling the Garden Cart be sure that you have all parts described in the Parts List
and Assembly Diagram located on the last pages of this manual.
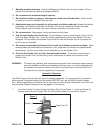
1. Insert the Handle (1) down through the Upper Tray (2)-see Figure 1. Insert one Screw (3)
through each side of the Upper Tray (2) and into the Handle (1) as shown in Figure 1.
Handle (1)
Upper Tray (2)
Screw (3)
Figure 1
SKU 91121 Page 3