


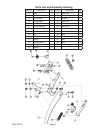

Page 3SKU 09712
NOTE: Some parts are listed and shown for illustration purposes only and are not available
individually as replacement parts.
PLEASE READ THE FOLLOWING CAREFULLY
THE MANUFACTURER AND/OR DISTRIBUTOR HAS PROVIDED THE PARTS DIAGRAM IN THIS
MANUAL AS A REFERENCE TOOL ONLY. NEITHER THE MANUFACTURER NOR DISTRIBU-
TOR MAKES ANY REPRESENTATION OR WARRANTY OF ANY KIND TO THE BUYER THAT
HE OR SHE IS QUALIFIED TO MAKE ANY REPAIRS TO THE PRODUCT OR THAT HE OR SHE
IS QUALIFIED TO REPLACE ANY PARTS OF THE PRODUCT. IN FACT, THE MANUFACTURER
AND/OR DISTRIBUTOR EXPRESSLY STATES THAT ALL REPAIRS AND PARTS REPLACEMENTS
SHOULD BE UNDERTAKEN BY CERTIFIED AND LICENSED TECHNICIANS AND NOT BY THE
BUYER. THE BUYER ASSUMES ALL RISK AND LIABILITY ARISING OUT OF HIS OR HER
REPAIRS TO THE ORIGINAL PRODUCT OR REPLACEMENT PARTS THERETO, OR ARISING
OUT OF HIS OR HER INSTALLATION OF REPLACEMENT PARTS THERETO.
Unpacking
When unpacking, check to make sure the parts listed on page 4 are included. If any parts are missing or bro-
ken, please call Harbor Freight Tools at the number on the cover of this manual as soon as possible
Warning: The warnings, cautions, and instructions discussed in this instruction manual cannot cover
all possible conditions and situations that may occur. It must be understood by the operator that com-
mon sense and caution are factors which cannot be built into this product, but must be supplied by the
operator.
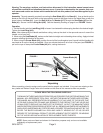
Assembly: The only assembly required is mounting the Saw Blade (#5) to the Base (#1). Line up the tab on the
blade so that it fits in the small hole on the base making sure that the larger hole on the blade lines up with the
larger hole on the Base (#1). Insert the Bolt (#19) and a Washer (#17) through the Saw Blade (#5) and the
Base (#1). Secure it with the Wing Nut (#20). See the Assembly Drawing on page 4 and FIGURE 1 below.
Operation
1. On the Handle, twist the Lock Ring (#10) to loosen it and extend the telescoping handle to the desired length.
Tighten the Lock Ring (#10).
Note: After telescoping the Handle and before cutting, take up the slack in the rope and secure it around the
Handle, out of your way.
2. When using the Saw Blade (#5), make sure the blade is straight and not bending when cutting. Apply mimimal
pressure allowing the blade to do the work.
3. When using the Pruner Blade (#2), position the end of the handle against your hip and hold the Handle with
one hand as far up the Handle as possible. Once you situate the branch to be cut in the jaws (see FIGURE 1),
pull on the rope to clamp the Pruner Blade (#2) shut, cutting the branch.
FIGURE 1
Bolt (#19
Saw Blade (#5)
Base (#1)
Pruner Blade (#2)
Insert
Branch
(Jaws)