


SKU 92508 For technical questions, please call 1-800-444-3353. PAGE 6
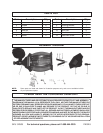
8. While being careful not to scrape either
the wall or the lantern, hang the Base
(1) of the lantern on the plastic hookon
the Mounting Bracket (10) by the hole in
the side of the Base - see Figure 1 on
the previous page.
9. The included Wire Nuts (11) may not be
suitable for all applications; ALWAYS
make sure that all connections are se-
cure and, if a wire nut will not tighten
properly, supply one of appropriate size.
Using the wire nuts,
carefully
attach the
wires in the lantern to the power supply
lines. For each connection, twist the nuts
over both wires clockwise until both
wires are secure. NOTE: If any differ-
ence from these directions is noted
in the color/type of supply lines, have
a licensed electrician finish the instal-
lation. Secure the wires in the order
explained below:
A. Attach the Black (hot) line to the Black
wire.
B. Attach the White (neutral) line to the
white wire.
C.
If a Green (ground) line is present,
attach it to the yellow-green wire.
If a Green (ground) line is not present
and the outlet box is a grounded
metal outlet box,
then attach the
yellow-green wire to the GND screw
on the Mounting Bracket (8) - see
Figure 1, previous page.
If a Green (ground) line is not
present and the outlet box is not
grounded,
contact a licensed elec-
trician.
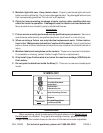
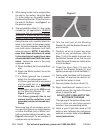
Make sure that all connections are se-
cure and that there is no metal showing
on either the Black (hot) or White (neu-
tral) connection before proceeding - see
Figure 2, above right, for an example of
a proper wire nut connection.
10. Turn the front part of the Mounting
Bracket (8) until the Bracket Screws (9)
are horizontal.
11. Carefully, so as not to pinch any wires
or pull on any connections, slide the
Base (1) off of the plastic hook and onto
the Bracket Screws (9) so that the end
of both Bracket Screws are visible at the
front of the Base.
12. Thread the Acorn Nuts (10) onto the
ends of the Bracket Screws (9) and
tighten just enough to hold the Base (1).
13. Gently rotate the Base until the lantern
is vertical. A level can be used to en-
sure that the lantern is level.
14. Securely tighten the Acorn Nuts (10).
15. Apply weatherproof sealant (not in-
cluded) around the top half of the base
where it meets the wall.
DO NOT APPLY SEALANT TO THE
BOTTOM OF THE BASE.
The opening at the bottom allows mois-
ture to drain out and helps prevent
moisture from accumulating inside.
16. Install a type A light bulb rated at 100
watts or less, following the instructions
outlined in number three of the
Mainte-
nance Instructions
.
Figure 2