


SKU 92050 For technical questions please call 1-800-444-3353. Page 3
9. Wear gloves and avoid sharp edges when assembling.
10. Make certain that the Greenhouse is placed on a falt, level, solid surface capable of
supporting the Greenhouse.
11. Because of aluminum dust, be certain to wash your hands after handling the
Greenhouse.
12. Never allow children to play with this product. Caution: Small parts can be easily
swallowed by small children.
WARNING: This product contains or, when used, produces a chemical known to the State of
California to cause cancer and birth defects or other reproductive harm.
(California Health & Safety Code 25249.5, et seq.)
Warning: The warnings, cautions, and instructions discussed in this instruction manual cannot
cover all possible conditions and situations that may occur. It must be understood by
the operator that common sense and caution are factors which cannot be built into
this product, but must be supplied by the operator.
Unpacking
When unpacking your Miniature Greenhouse, check to make sure the following parts are included.
If any parts are missing or broken, please call HARBOR FREIGHT TOOLS at 1-800-444-3353.
Assembly/ Operation
Your Miniature Greenhouse will require complete assembly prior to use. It is important that you read
the entire manual to become familiar with the product BEFORE you assemble and use the
Greenhouse. Before assembling and operating the Greenhouse be sure that you have all parts
described in the Parts List and Assembly Diagram located on the last pages of this manual.
Note that throughout the assembly process all parts of the Greenhouse frame will be
attached using the Bolts and Nuts (11) provided. Parts have been labeled with the appropriate
part number to help with assembly. Refer to the assembly diagrams and figures for all steps. Do
not install Windows until specified in the assembly directions.
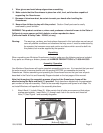
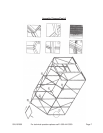
1. Attach Back (1) to both Sides (2). Make certain that all sides are square and that edges
overlap appropriately. Insert Bolts (11) through each hole in the corner and thread on
Nuts (11)-see Figure 1 and assembly diagrams.
Figure 1-Attaching 1 to 2
Bolts and Nuts (11)