


Page 5
SKU 90757
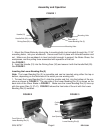
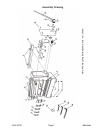
Inserting the upper Dies (37-41)
1. Loosen the Bolts (5) and insert the desired size Die (3, 37-41), or combination of dies, and
then tighten the Bolts (5). See FIGURE 3. Make sure the upper Dies (3, 37-41) you insert are
lined up with the Lower Die (2).
Cutting Metal
1. Insert the metal workpiece into the cutting slot (See FIGURE 3). Make sure that your
hands are clear, and move the Handle (31) away from you to cut. When finished cutting
return the Handle (31).
Bending Metal
Note: We recommend you practice on a scrap piece of metal.
Warning! Always check to see that the Dies (3, 37-41) and the Lower Bending Die (2) are
securely attached.
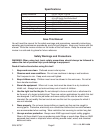
Warning! Do not exceed the Shear Brake’s listed capacities (see the Specifications table on
page 2).
1. After installing the appropriate Die (3, 37-41), insert the the workpiece into the jaw opening.
See FIGURE 3.
Warning! Keep your fingers and hands clear of the jaw opening when bending metal or
removing workpieces.
2. Work the Handle (31) toward you until the workpiece is bent to the desired angle.
3. Lift the Handle (31) and remove the workpiece.
Assembly and Operation (continued)
Maintenance
1. Clean out the Shear Brake after each use. Make sure any metal filings, dirt, grease, or
debris are removed from the unit.
2. Use a light machine oil to lubricate the moving parts on a regular basis to maintain smooth
movement.
3. Periodically check the Shear Brake for signs of wear including cracks, bends, or signs of
stress or breakage. Do not use the Shear Brake if faults are discovered. Take the Shear
Brake to an authorized service technician if repairs are required.