


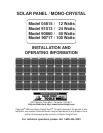

SKUs 04815, 91013, 90860, & 90717 Page 5
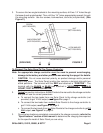
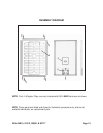
To Mount The Solar Panel At An Angle:
1. NOTE: For increased pickup of solar energy, and to minimize the collection of debris
on the Solar Panel, it is recommended that the Solar Panel be installed on the mount-
ing surface at an angle. (See Figure C, next page.)
2. In order to mount the Solar Panel at an angle, you will need to purchase or fabricate
two
angle brackets
from wood or metal (not provided) as shown in Figure C (on page
6). For best results, it is recommended that the angle brackets be approximately 1”
wide by 1/2” thick and of appropriate height.
INSTALLATION INSTRUCTIONS
NOTE:
All part numbers below refer to the parts shown on the Assembly Diagram
(page 10) of this manual.
WARNING: BEFORE drilling pilot holes for any of the following mounting in-
structions, take care that the location to be drilled in is free from all wires,
cables, utility lines, and any other obstructions.
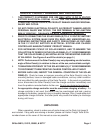
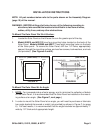
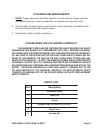
To Mount The Solar Panel Flat On A Surface:
1. Locate the Solar Panel so that it faces the sun the greater part of the day.
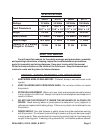
2. Model #04815 and #91013 have four mounting holes located on the back of the
Solar Panel. Models #90860 and #90717 have eight mounting holes on the back
of the Solar panel. To secure the Solar Panel, drill four 1/4” holes, appropriately
spaced, through the mounting surface, and use four screws, lock-washers, and nuts
(not provided). (See Figures A and B.)
1/4” MOUNTING
HOLE
1/4” MOUNTING
HOLE
MOUNTING
SURFACE
NUT
LOCK WASHER
SCREW
(SIDE VIEW)
FIGURE A
(REAR VIEW)
FIGURE B
Hardware Not Included