


Page 5SKU 90326
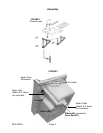
Assembly (continued)
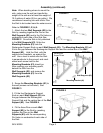
FIGURE 3
FIGURE 4
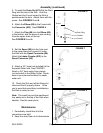
FIGURE 5
Note: When deciding where to mount the
sink, make sure the wall can handle the
weight of the sink and at least the weight of
10.5 gallons of water (8 Lbs. per gallon). We
recommend mounting into wall studs. Plan
the Sink to be located near the water source.
Refer to FIGURES 1,2,3,4,5.
1. Attach the two Wall Supports (#3) to the
Sink by meshing together the Pins on the
Wall Supports (#3) next to the Pin Holes on
underside of each side of the Sink.See
FIGURE 2. Once the Sink is fully attached
to the Wall Supports (#3), fit the four
Mounting Brackets (#1) onto the
Rectangular Support Ends on each Wall Support (#3). The Mounting Brackets (#1) will
fit into the gap between the Rectangular Support End and the vertical bar of the Wall
Support (#3). Hold the Sink, with the
supports and brackets, up against the
wall. Use a level to make sure the Sink
is perpendicular to the ground, and mark
where each screw hole on the
Mounting Brackets (#1) should go.
After marking your mounting spots,
detach the Sink from the
Wall Supports (#3), and remove the
Mounting Brackets (#1) from the
Wall Supports (#3).
2. Screw the Mounting Brackets (#1) to
the wall (screws not included). See
FIGURE 3.
3. Fit the four Rectangular Support
Ends on each Wall Support (#3) into
the gap between the Rectangular
Support End and the vertical bar of the Wall
Support (#3). See FIGURE 4.
4. Fit the three Pins on each Wall
Support (#3) to the Sink by meshing
together the Pins on the Wall
Supports (#3) with the corresponding
Pin Holes on underside of each side of
the Sink.
Rectangular
Support Ends
Pins
Mounting Bracket (#1)
Wall Supports (#3)