


non-slotted screws and loosen the slotted
screws. This will enable you to remove the
mounting plate (Figure 6).
4.
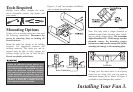
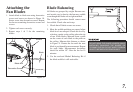
Hanging the Fan
REMEMBER to turn off the pow-
er. Follow the steps below to hang your
fan properly.
NOTE: This fan is recommended for the
standard ceiling mounting using the downrod
provided with this fan. When using standard
ceiling installation with the 18 inch downrod
provided, the distance from the ceiling to the
bottom of the fan blades will be approximate-
ly 21.5 inches.
IF YOU FEEL THAT YOU DO NOT
HAVE ENOUGH ELECTRICAL WIRING
KNOWLEDGE OR EXPERIENCE, HAVE
YOUR FAN INSTALLED BY A LICENSED
ELECTRICIAN.
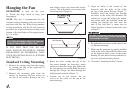
Standard Ceiling Mounting
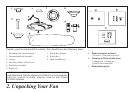
Remove the canopy ring from the canopy 1.
by turning the ring to the right until it
unlocks (Figure 5).
Remove the mounting plate from the 2.
canopy by loosening the four screws on
the top of the canopy. Remove the two
Remove
Loosen but Do
Not Remove
Figure 5
Figure 6
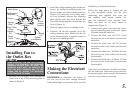
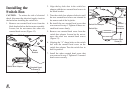
Route the wires exiting the top of the 3.
fan motor through the decorative motor
collar cover then the canopy ring. Make sure
the slot openings are on top. Route the wires
through the canopy and then through the
ball/downrod assembly (Figure 7).
Loosen, but do not remove, the set 4.
screws on the collar on the top of the
motor housing.
Align the holes at the bottom of the 5.
downrod with the holes in the collar
on top of the motor housing (Figure 7).
Carefully insert the hanger pin through
the holes in the collar and downrod. Be
careful not to jam the hanger pin against
the wiring inside the downrod. Insert the
locking pin through the hole near the
end of the bolt until it snaps into its
locked position, as noted in the circle inset
of Figure 7.
Re-tighten the set screws on the collar on top 6.
of the motor housing.
Make sure the grommet is properly installed 7.
in the collar cover, then slide the collar cover
on the downrod until it rests on the motor
housing. Be sure that the canopy and the col-
lar cover are both oriented correctly.
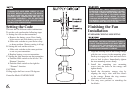
8. Proceed to “Installing the Fan” section.
FAILURE TO PROPERLY INSTALL SET SCREWS
IN STEP 6 COULD RESULT IN FAN LOOSENING
AND POSSIBLY FALLING.
THE FAN MUST BE MOUNTED WITH A MINIMUM
OF 7 FEET CLEARANCE FROM THE TRAILING
EDGE OF THE BLADES TO THE FLOOR.