


Use this procedure whenever starting the pressure
washer to help insure that the unit is ready to operate
and starting is done safely.
1. Check the oil level.
Pump: Add SAE 20 or 30 weight non-detergent oil
as necessary.
2.
Turn on the water supply.
Never run the unit dry. Costly damage to the pump
c
will result. Always be sure the water supply IS
completely turned on before operating.
3.
4.
5.
6.
7.
Trigger the gun until water sprays from the tip
indicating that the air is purged from the system.
Plug the electrical cord into a proper, grounded,
GFCI-protected outlet.
ALWAYS engage the gun’s trigger safety latch
whenever you stop spraying, even for a moment to
reduce the risk of fluid injection or splashing in the
eyes or on the skin if the gun is bumped or triggered
accidentally.
Most pressure washer spraying is done at full
pressure. On this pressure washer there is an
adjustable unloader valve that permits operation at
less than maximum pressure. To reduce pressure,
for special cleaning applications, turn the pressure
control knob on the unloader counterclockwise, as
needed.
ALWAYS observe the followinq CAUTIONS to avoid
costly damage to the pressu‘;e washer.
CAUTION
DO NOTallow the pressure washer to idle for more
than 10 minutes. Doing so may cause the
recirculating water to overheat and seriously
damage the pump. Turn off the pressure washer if it
will not be spraying or cleaning at least every 10
minutes. If heated inlet water is used, reduce this
time further,
DO NOT run the pump dry, which will quickly
damage the pump. Be sure the water supply is
fully turned on before starting the pump.
DO NOToperate the pressure washer with the inlet
water screen removed. This screen helps keep
abrasive sediment out of the pump, which could
clog or scratch the pump. Keep this screen clean.
DO NOT pump caustic materials; such materials
may corrode the pump components.
Chemical Injector
BE SURE that all chemicals used in the chemical
injector are compatible with the wetted pans of the
hose, gun, wand and tip, as given in the Technical Data
(page 22). Always read the chemical manufacturer’s
literature before using any chemical in this pressure
washer.
~ri~RK!rZa”““‘.l
precautrons regarding use of goggles, protectrve
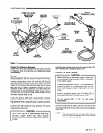
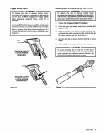
826: A downstream chemical injector is provided with
the pressure washer. Insert the chemical strainer
(attached with clear tubing to the chemical injector) into
the container of chemical. Turn the control ring on the
adjustable nozzle clockwise. This causes a drop in
pressure that actuates the chemical injector. Close the
adjustable nozzle to deactivate the chemical injector
and produce high pressure for rinsing. The flowrate of
the chemical is regulated by turning the chemical
adjustment knob on the injector. Maximum chemical
flow is at a full two turns counterclockwise from the
closed (clockwise) position.
1235: The chemical injector is an accessory. See the
chemical injector instruction manual.
WARNING
DO NOT attempt to open or close the adjustable
nozzle when the spray gun is in use. Be sure that
r
the trigger safety latch on the gun is in the “ON”
position before adjusting to avoid serious bodily
injury or fluid injection.
Check the distance that you will need to hold the spray
nozzle from the surface by test spraying on a scrap of
similar material. For soft surfaces, such as wood, hold
nozzle 3 ft (1 m) from the surface and gradually bring it
closer, checking to see if the high pressure spray is
damaging the surface.
Mist the wet surface with cleaning solution. Let it soak
briefly, then use the high pressure rinse to “chisel” off
the soil. Keep the nozzle at an angle to the surface and
at a distance determined to be best for the surface. If
some soil remains, repeat the procedure, letting the
chemical soak a little longer. Stubborn soil can be
cleaned off better with a stronger, heated cleaning
solution.
Protect surfaces that might be damaged by the cleaning
solution or the high pressure spray. Rinse the solution
before it dries.
8.
See the chemical injector or kit manual for detailed
cleaning information if this accessory is used.
6
308-518