


Repair
10 3A0540L
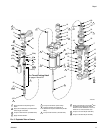
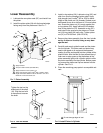
8. Remove the wet-cup (34) and o-ring (52). Remove
the TSL pump piston seal (36), spring (35), and
o-rings (51).
9. Remove the throat cartridge (27). Remove the
o-ring (52), glands (32, 33), packings (30, 31), and
spring (28).
10. Remove the nuts (12), lockwashers (11), and six
cylinder capscrews (10). Lift off the outlet valve
housing (2).
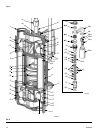
11. Lift the riser tubes (6) and cylinder (4) off the inlet
valve housing (7). The piston assembly may stay in
the cylinder. Remove the seals (3 and 5) from the
inlet and outlet housings (2, 7). See F
IG
. 5.
NOTE: Tap on the valve housings with a plastic mallet
and use a slight rocking motion to help loosen and
remove the cylinder and tubes.
12. If Part No. 218742 accessory pump stand is used,
unscrew and remove the three pump stand bolts.
Lift the inlet valve assembly off the stand. Place the
inlet valve housing (7) face down on a protected
surface.
13. Use a 13 mm socket wrench to loosen and remove
the twelve capscrews (9) and lockwashers (8) from
the inlet manifold (1). See F
IG
. 5.
14. Lift the manifold (1) off the inlet valve housing (7)
and remove the seats (13 and 14). Remove the
o-ring (15) from the seats. Remove the balls (18),
ball guides (16) and seals (17).
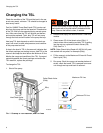
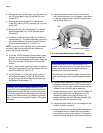
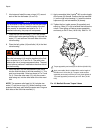
15. Inspect the pressure relief valve in the fluid inlet
seat (14) to make sure it is not clogged. Press down
on the valve's ball to see if the ball and spring are
free to move. See F
IG
. 4.
16. Push the piston assembly through the cylinder just
enough to expose the piston (26) flats. Secure the
piston flats in a vise. Use a plastic mallet to tap the
cylinder (4) up and off the piston assembly.
17. Loosen the piston nut (21). Use Tool Kit 220385 (to
remove the piston shaft (19) and piston nut (21).
Remove the piston nut o-ring (22) and o-ring
retainer (20) from the shaft. Remove the plate (24)
and the seal (25) from the piston (26).
18. Inspect the piston shaft (19). If it is damaged or the
surface is scored, replace it.
19. Clean all piston parts and the cylinder thoroughly in
a compatible solvent. Inspect the inner surface of
the cylinder for scoring, and replace it if necessary.
A scored cylinder will quickly damage the packings.
NOTICE
Be careful not to drop or damage the balls (18) or
seats (13 or 14). A damaged ball or seat cannot seal
properly and the pump will leak. One inlet valve seat
(13) can be reversed to provide longer use of the seat.
However, the fluid inlet seat (14) contains a pressure
relief valve and is not reversible. See F
IG
. 5 for proper
orientation.
F
IG
. 4. Inlet Seat with Pressure Relief Valve
NOTICE
If the pressure relief valve in the inlet seat (14) is
clogged or filled with material, soak the seat in a com-
patible solvent. Make sure all material residue is
cleaned from the ball and seat area.
If the relief valve cannot be thoroughly cleaned so that
the ball and spring are free to move, replace the seat
(14).
TI15631a
15
14
ball
spring
pressure relief valve